Friday, August 26, 2011

Enselada de Elote

For easier eating than on the cob, try this!

Elote means “corn,” but it’s synonymous with how corn is prepared at markets and fairs all over San Diego. If you’ve seen the tables near the corn on the cob at the fair, covered in condiments and wondered what they hell they were for, they were for dressing your corn up, Mexi-style. Now in a salad!

Ingredients
1/2 c. mayo (use vegenaise if that's your thing)
1 lime, juiced
1 Tbsp. chili powder
1 garlic clove, minced
1/4 c. grated Parmesan or Pecorino Romano (omit to make vegan)
1/2 bag of frozen corn (thawed)
1/4 red onion, diced
2 Tbsp. chopped cilantro
Salt to taste


Procedure
In a large bowl, add mayo, lime, chili powder, garlic and cheese. Stir to combine.

Add remaining ingredients and gently toss to mix through and coat with mayo mixture.

Transfer to plates or a serving dish and AAAAAAAWWWWWW YEEEEEEEAAAAAH!


ProTips
  • Great to make up to 1 day ahead and take to parties.
  • Trader Joe’s sells awesome frozen grilled corn, highly recommended for this application.


Restaurant-Style Guacamole

Little plate on big plate for much improved presentation over plastic tub and bag of chips

Great guacamole doesn’t need a lot of fussing, or mystery flavor packets from the supermarket, just a little prep and you too can be making authentic and delicious guac just like you’d get for ten bucks at a nice restaurant.

Ingredients
For each avocado:
1 Tbsp. small dice tomato, drained
1 Tbsp. small dice red onion
1 Tbsp. small dice red pepper
1 Tbsp. chopped fresh cilantro leaves
1 tsp. fresh squeezed lime juice
1 garlic clove, minced
1/2 tsp. salt
1/2 tsp. finely minced serrano/jalapeno (optional)

Procedure
As you prep ingredients, put them in a bowl (not the serving bowl, you savage!): Dice your onion, add to the bowl; dice the pepper, add to the bowl; and so on, until the LAST thing you add is the avocado. 

Avocados should be sliced through their poles to the pit, and twist to separate. Set aside the half with the pit, and get to work on the other half- slice through the fruit along its length, to the skin, but not through it. Turn the avocado in your hand and repeat through the width of the fruit. You should be slicing a crosshatch pattern in the fruit, while leaving the skin intact. Set that half aside. Position the other half on the counter and give the seed a good whack with your knife, so it embeds in the pit. Pick up that half and twist to remove the pit. Repeat cross hatching pattern with your newly pitless avocado half.

Fold the avocado in half over the bowl and squeeze out the chunks, like you’re squeezing toothpaste from a tube- squeeze from the bottom. Now all you have to do is mix it all up with a fork, mashing any chunks that are too big for your liking. Just keep mashing until you like what you see. Taste it and add more salt, cilantro, or lime juice as necessary (if you don’t know what it needs, it needs salt!), when it’s good, and only then, spoon it into the serving dish.

ProTips
  • Recipe is designed to scale! Big party = big guac 
  • Salt, lime, cilantro and onion are key- everything else is nice to have. 
  • Eyeball this one, don’t bust out measuring tools.
  • For max juice from citrus, zap in microwave for 30 seconds before you cut them in half OR roll them on the counter to squish and free juice.
  • To get leaves without stems from a bunch of cilantro, shave that puppy!
  • To remove the pit from your knife, pinch the blade behind the pit and it will pop right off. 
  • To drain diced tomatoes, salt them and throw them in a little bowl on a folded paper towel to soak up the liquid. I usually prep them first so they have maximum drainage time so they don’t make the guac watery.


Monday, August 22, 2011

Vegan Katsu Dinner

Japanese dinner comes together quickly if your freezer and pantry are well stocked

This dinner was made up of a bunch of little things. I prefer to eat this way, with just a few bites of each dish and lots of variety.

The revelation for me was using spicy boca chick'n patties as my katsu (cutlet). Once I heated the patty up in a skillet, toasting the breading in the process, and sliced it up with katsu sauce (kinda like a bbq sauce, recipe follows), this dish was exactly like regular ol' tonkastu- maybe lighter and less greasy!

I served my katsu with:

  • Zaru cha soba - cold green tea buckwheat noodles. Be sure to rinse/wash well with plenty of cold water after cooking. This was simply tossed with sesame oil and toasted sesame seeds. 
  • Inarizushi - the two pouches made of fried tofu skin, stuffed with sushi rice. (recipe follows)
  • Seasoned Tomato - fresh tomato slices sprinkled with Penzey's buttermilk ranch herb mix- a weird choice, I know
  • Seaweed salad with cucumber and red onion (recipe follows)
  • Edamame with smoked sea salt - nuke frozen soybeans and a Tbsp. of water in a covered dish in the microwave
  • Gari - young sweet pickled ginger, like you'd get with sushi
  • Umeboshi - pickled plum with a strong flavor- I like to nibble a little before taking a bite of inarizushi


Katsu Sauce
Mix together:

  • 1/2 c. Ketchup
  • 1 Tbsp. Worcestershire sauce
  • 2 Tbsp. Soy Sauce
  • 1 tsp. Dry Mustard Powder
  • 1 tsp. Sriracha sauce


Sushi Rice Dressing
Mix together:

  • 2 Tbsp. Rice vinegar
  • 2 Tbsp. water
  • 2 tsp. agave nectar 

Pour over 2 cups of cooked white short grain rice (I use Botan Calrose) and toss gently to coat each grain of rice with the dressing and cool it down quickly.

Seaweed Salad with Cucumber and Red Onion

  • 2 Tbsp. sliced wakame or seaweed of your choice, reconstituted in cold water (5-10 minutes)
  • 1/2 inch of cucumber
  • red onion
  • 1 Tbsp. rice vinegar
  • 1 Tbsp sesame oil
  • 1 tsp. soy sauce
  • 1/2 tsp. agave nectar
  • salt to taste 

Shave red onion with the thinnest setting of a mandoline/japanese slicer until you have about 1 Tbsp of onion ribbons. Microwave on high for 30 seconds in a dish full of water. Drain and pat dry. This process takes a lot of the harsh bite out of raw onions.
Shave cucumber on the same setting.
Stir together remaining ingredients to make dressing and toss with seaweed, onion and cucumber.

Friday, August 19, 2011

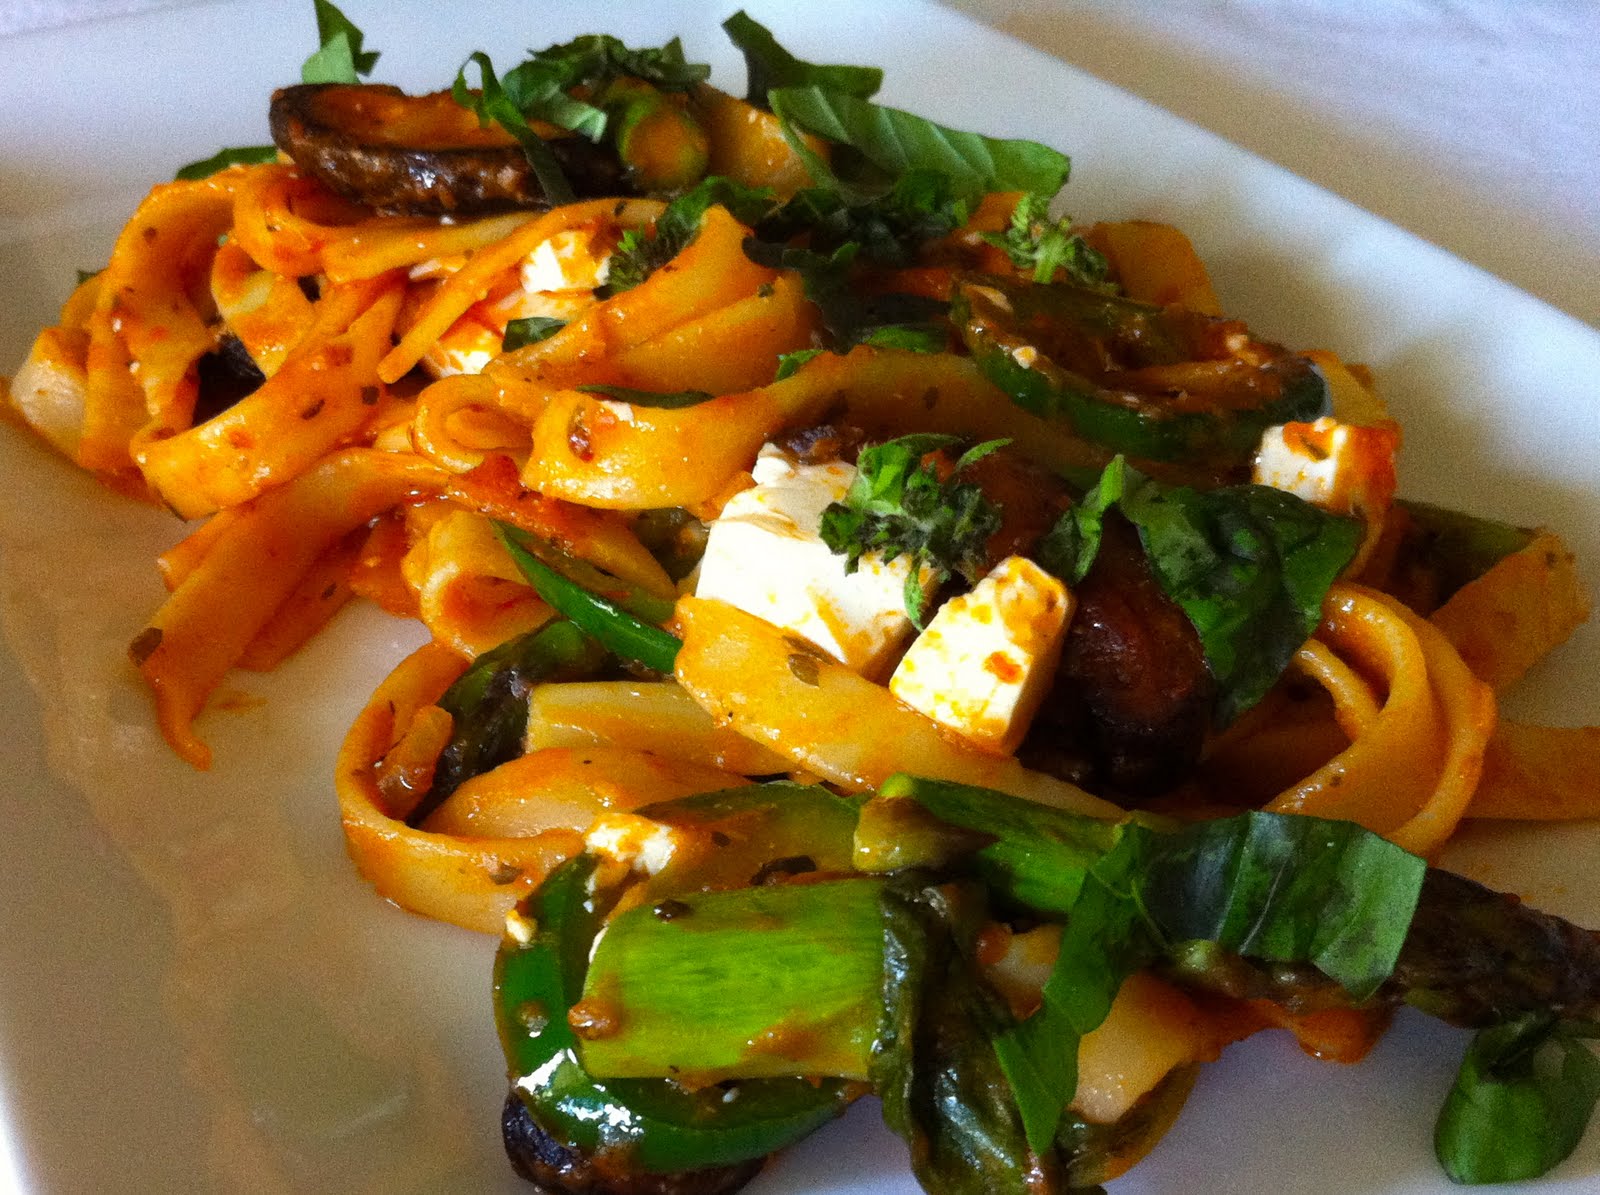
Fettuccine Arrabiata with Asparagus, Shiitake Mushrooms and Mock Mozzarella

Lunch of the gods

  • 1 serving Cooked Fettuccine
  • 1/2 c. Marinara Sauce (recipe follows)
  • 2 oz. Mock fresh mozzarella cubes (recipe follows)
  • 1 Jalapeno pepper, seeded and sliced
  • 4 shiitake mushrooms 
  • 2 asparagus spears, sliced into 1 inch pieces
  • 1 tsp. red chile flakes
  • 1 Tbsp. olive oil
  • salt and pepper to taste
  • Fresh basil garnish


Heat a large pan over medium heat and add olive oil. Saute mushrooms until well cooked, about 5-10 minutes. Add jalapenos and asparagus and saute until barely cooked/still crunchy, about 3 minutes. Stir in red chile flakes and marinara sauce and heat through. Add cooked pasta and stir to combine and heat through. Add mock fresh mozzarella cubes and heat through. Taste and adjust with salt and pepper. Serve with fresh basil garnish.

Marinara Sauce
1 14 oz. can Crushed Tomatoes
1/4 c. finely diced onion
1 big clove garlic, minced/pressed
2 tsp. Dried Italian Oregano
1 tsp. Dried basil
1/2 tsp. Dried Thyme
olive oil
salt

Heat a skillet over medium heat and coat the bottom with a little olive oil. Add onion and saute until translucent (3 minutes). Add garlic and herbs and stir to combine. Stir in tomatoes and raise the heat to bring to a boil, stirring often. Once boiling, lower heat to low and simmer for 30 minutes. Taste and add salt.

Mock Fresh Mozzarella
1 block firm tofu
2 tsp. salt
juice from 1 lemon
1 c. cold water

Press firm tofu for 30 minutes between plates, cutting boards, whatever. Combine water, lemon juice and salt in a ziploc bag, add tofu, and marinate for 30 minutes. Slice into 1/2 inch cubes.

First, locate the teats on your cashew...

I've been buying almond, coconut, and/or soy milk instead of milk for quite some time now. Recently I concluded that making nut milk shouldn't be that hard and googled around for guidance. I think I have this process pretty streamlined, have stuff to say, and am ready to document it, so here goes:

Cashew Milk
Cashew milk is flipping delicious and easy to make, so if you want to try making nut milk, I highly recommend starting with cashew. If you have a kick ass blender (vita-mix, blendtec, etc.) you won't even need a nut milk bag/fine mesh to strain it, because you won't need to strain it at all.


  1. Get RAW un-dicked around with cashews. No salt, no whatever else. I buy them in the bulk bin now. You will need about 1 cup of cashews to make 3 cups of cashew milk.
  2. Soak them in plenty of water for a few hours or even overnight. You can soak them in the pitcher of your blender, so you don't dirty another thing in the kitchen. 
  3. Strain and rinse them off.
  4. Add them back to the blender pitcher and add just enough fresh cold water to cover. I use filtered water from my Brita for this.
  5. Blend on your blender's juice setting (my Blendtec starts out slow, then beats the crap out of them for maybe a minute and a half on this setting).
  6. Behold your cashew cream! Depending on what you're up to, you might need to stop here. More on that later.
  7. Add in the rest of the water (up to the 3 cup mark is a good place to start) and put the lid back on securely. I shake the pitcher at this point to basically wash down the sides.
  8. Blend again on the whole juice setting.
  9. Check it out! It looks like milk! 

At this point it tastes very very neutral, so give it a taste and adjust for the consistency you like. If it's too creamy, just add more cold filtered water. I also like to buzz in a pinch of sea salt, a tiny bit of maple syrup, a tiny bit of vanilla extract, and a tiny pinch of cinnamon. If you go overboard on that stuff, it tastes like Horchata, which is damn awesome, as well.

If you find, as I have, that you'll want to make a 3 cup batch of this every week, I recommend soaking a big batch of cashews all at once, then portioning them out into ziploc bags for the freezer. If you don't want to wait 20 minutes while they thaw a little, they can be zapped in the microwave for 30 seconds when you're ready to make milk, so the whole process from using pre-soaked, frozen cashews takes only five minutes.

Other ideas
Double Honey Nut Cheerios 
Flavor your nut milk with honey and a pinch of salt and pour over your Honey Nut Cheerios. OMG Sweet Jesus.
Honey Nut Semi Freddo
Make honey nut semi-freddo by flavoring the cashew cream with plenty of honey and a good pinch of salt and freezing it. It should be too sweet to eat before you freeze it because freezing dulls the sweetness quite a bit. I stirred it once or twice as it was freezing too. This was amazingly good. I think I'm going to try this with hazelnut cream and chocolate next.
Coffee Cream
Coffee cream can be made by adding less water than when making milk, and can, of course be flavored however you like.
Chocolate Cashew Milk
Mix 1 Tbsp. agave nectar with 1 Tbsp. cocoa powder and a pinch of salt until it looks like Hershey's chocolate syrup. Add a little cashew milk to thin and stir until dissolved. Add more cashew milk until it tastes the way you want.
Delicious Cashew Spread
Start with 1 cup of extra thick cashew cream and add 2 Tbsp. nutritional yeast, chopped fresh herbs, cracked black pepper, and garlic (or any combination of that stuff- this combo tastes a lot like Boursin cheese). Awesome on crackers, crudite, and baked potatoes.
Creamy coffee!

Thursday, May 26, 2011

Apple Wood Grilled Hamachi Kama with Yuzu Ponzu

Hamachi (Yellowtail) Kama (Collar) is amazing. I'm having trouble even coming up with more to say. It's usually grilled and served with ponzu and is a delicious bit of fish. Kama is often unavailable because the kitchen staff eats it before it ever makes it on a menu. Like the oysters that whoever is carving your Thanksgiving turkey ate long before anyone noticed them (See? You might not even know what the hell the "oysters" are! some a-hole in your family has been hiding them from you) Kama is the ultimate ChefSnack! The collar is the cheek of the fish, and is some of the most succulent and delicate meat you will ever have. You may also see salmon collar available at some Japanese restaurants and even tuna collar very rarely. I got this one at Nijiya Market for under $4. I see it served in restaurants for around $14. Score!

Ponzu is a simple sauce or dressing made from just a few ingredients, but one is the juice of yuzu, a Japanese lemon. If you don't have one (I sure as hell don't) you can buy bottled juice from a Japanese market or substitute in your favorite citrus. I really dig orange ponzu too. For this recipe, I used the bottled yuzu juice.

Apple Wood Grilled Hamachi Kama with Yuzu Ponzu

Preheat your grill to 400 degrees, and if you have any mild smoking wood chips handy, toss some in after a 30 minute soak. I had apple, so I used apple. It ROCKED.

Make your ponzu sauce:
3 parts soy sauce
2 parts rice wine vinegar
1 part yuzu juice
dash of sesame oil

Prepare Yellowtail Collar(s):
Sprinkle the fish all over with sea salt.
Lightly brush with peanut or vegetable oil.
Throw on the grill skin side down, and close the lid. Cook for 3 minutes.
Flip the fish, and spoon a couple tablespoons of ponzu sauce on the skin side of the fish (now facing up). Close the lid again, and cook another 2 or 3 minutes.
Start to grill skin side down. I used my trusty Big Green Egg which has also been called the Aguacate from time to time. 

Flip the fish one last time so that you can spoon on some more sauce and as soon as the sauce is on, remove the fish to a serving plate. Serve with chopsticks a dish of ponzu.
Just eat it! Don't be afraid to just jump in with your chopsticks and fingers to get all the meat.

Friday, May 20, 2011

Crepes

This recipe is my favorite crepe recipe because it produces the absolute thinnest crepes AND the batter doesn't need to rest because it doesn't use flour and so mixing it doesn't produce gluten. It's adapted from The Cake Bible and I've used it for years with great success. (Please pardon my bed-head, it was Sunday morning and I'd just rolled out of bed into the kitchen.)
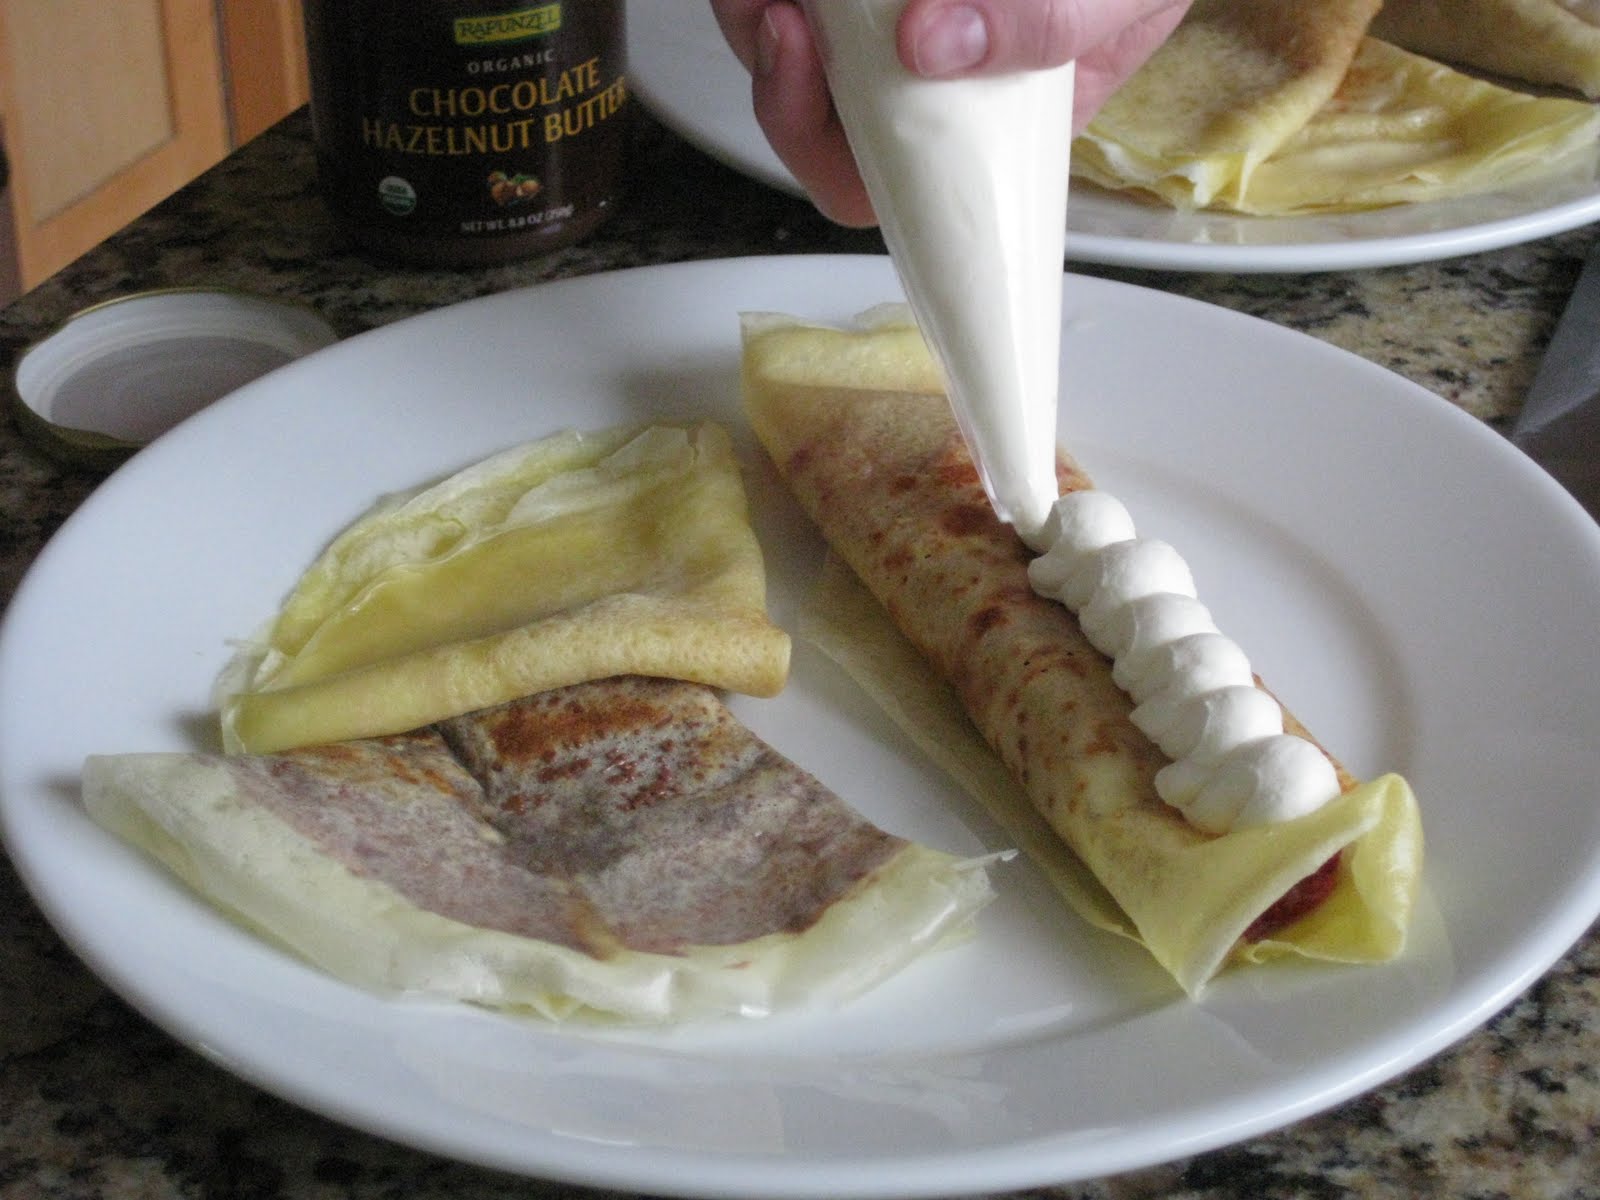
Strawberry jam filled crepe getting dressed with whipped cream; Lemon sugar crepe; Nutella impostor crepe
Ingredients
3 eggs
1 c milk
3 Tbsp unsalted butter, melted
3/4 c cornstarch
1/8 tsp salt


For Sweet Crepes:
1 Tbsp sugar
1 Tbsp Grand Marnier


For Savory Crepes:
handful of rough chopped fresh herbs
or
1/2 tsp Dijon mustard


Clarified butter for cooking the crepes (just nuke butter until melted and scrape off/fish out the white bits, leaving clear yellow goodness)


Procedure
Place the ingredients (except clarified butter), in the order given, in a blender and blend at high speed for 30 seconds.


Heat a crepe pan on medium-high heat until hot enough to sizzle a drop of water. Brush the pan lightly with clarified butter and pour 2 tablespoons of batter into the center of the pan. Immediately tilt the pan to the left and then down and around to the right so that the batter moves in a counterclockwise direction, swirling to cover the entire pan.


For the thinnest possible crepes, pour excess batter immediately back into the blender with the rest of the batter. So, to recap: Pour in batter, swirl around fast, quickly dump extra back where it came from and return to heat. This should all happen quickly- otherwise, adjust the thing you're using to pour in your batter so you're pouring in exactly the right amount. 1/4 cup measure giving you too much batter in your pan? Try another scooper that's smaller.
Cook until the top loses it's shine and starts to dull and the edges begin to look dry and lacey, about 20 seconds. Use a small metal spatula to lift the edge, check to see if the crepe is speckled with brown underneath, then flip the crepe with your fingers and cook for about another 15 seconds.
I have a blue steel crepe pan. No Really. I use my offset icing spatula for crepes, it's thin and easy to handle.
You can fill them however you like but I like mine brushed with melted butter, sprinkled with sugar and a squeeze of lemon.
Breakfast of Champions!