Showing posts with label Dessert. Show all posts

Tuesday, December 27, 2011

Plum Pudding for Christmas

Before I forget what I did here, I better write it down, because it was delicious.
I happen to have a pudding mold (of course I do) but this is unnecessary, you can use a heatproof bowl with a tight lid

Ingredients

  • 3 c lightly packed down crumbs from good white bread with the crusts on (about one half of a 1 lb loaf of bread, crumb-ified in the food processor)
  • 1 c each: black raisins, golden raisins, and prunes, chopped in the food processor
  • 1-1/3 c dark brown sugar (I like Muscovado sugar from India Tree)
  • 1/2 tsp cinnamon
  • 1/2 tsp mace
  • 1/2 tsp nutmeg
  • 1/4 tsp salt
  • 1 c butter, melted
  • 4 large eggs, lightly beaten
  • 1/8 tsp almond extract
  • 1/2 c bitter orange marmalade (seville orange marmalade from Trader Joe's works great)
  • 1/3 c spiced rum
  • 1/2 c cognac, heated on the stove before attempting to flambe
  • Sprigs of greenery like juniper and holly, optional
Procedure
Toss the bread crumbs in a large mixing bowl with the prunes, raisins, sugar, cinnamon, mace, nutmeg, and salt.

Then toss with the melted butter, and finally with the eggs, almond extract, orange marmalade, and rum.

Pack the pudding mixture into the greased steaming container (either a pudding mold with a tight fitting lid, or a bowl with a tight fitting lid) and cover with a piece of greased foil and snap the lid over the foil. Set the container in a stock pot, or whatever you will be steaming in, and add enough water to come a third of the way up the sides of the pudding. Cover the steaming pot tightly and bring to a boil, lower the heat to a simmer, and steam about 6 hours. Check every hour or so to make sure you're not losing too much water and top off if necessary.

Don't unmold it yet, it can be kept in the fridge about 4 months to mature. I made mine 2 days before and it was still delicious. Day of, bring it out of the fridge and allow it to come to room temp before unmolding the pudding. I decorated mine on a cake plate with holly and juniper, and set it out for decoration.

When ready to flambe, heat the cognac in a saucepan on the stove until hot but not boiling and pour the hot cognac into a sturdy pyrex measuring cup with a spout. Grab a long match and head to the table, hitting the lights on your way.

Pour some of the cognac on the pudding and ignite with the match, then pour the rest of the cognac on the pudding, allowing the stream to ignite. Don't worry if the flames crawl up into the pyrex, just keep pouring steadily- when it's empty, it will continue to burn inside the cup, but will soon go out- or you can blow it out like a big baby (me).
The holly catches fire. No biggie.


Thursday, September 15, 2011

French Toast Bread Pudding

Don't take them out before they're brown or they'll collapse too much, like souffles

This can be made as one big pudding, but the individual ones are very versatile and look more special.

Ingredients: 
(per 2 big muffin tins/4 regular size muffin tins)
1 burger bun, torn into 1” chunks
2 eggs
1/2 c. milk
1/2 c. cream
1 Tbsp. sugar
1/4 tsp. vanilla extract
pinch nutmeg
pinch cinnamon
pinch orange zest
2 Tbsp. raisins (golden is nice)
2 Tbsp. chopped pecans
Warm maple syrup 

Procedure
Preheat the oven to 350.

Butter 2 of the muffin tin spots if you’re using giant muffin tins, or 4 if you’re using regular size.

Put down a layer of bread chunks, then some raisins, then some more bread and top with more raisins.

Whisk the eggs, spices, vanilla, and sugars together in a medium bowl. Add milk and cream and whisk some more. Pour this custard mixture over the bread chunks.

Make sure bread gets moistened completely, cover and weight down the bread a little. Allow to soak for 30 minutes.

Sprinkle pecans on top, and bake for 30 minutes, until brown and puffed.

Allow to cool a little before serving with warm maple syrup.

ProTips
  • Be careful when you press down on the bread to moisten that you don’t overflow your muffin tin.
  • Make sure these are good and browned when you pull them out. If you pull them out when they’re too underdone, they’ll collapse a lot as they cool.
  • Maple syrup is not maple flavored syrup or pancake syrup (basically flavored corn syrups). It comes from a sugar maple tree and has one ingredient: Maple Syrup. Grade B is more flavorful and darker than Grade A- kind of counter intuitive, but I prefer the Grade B syrup.
  • To turn this into a dessert, serve with whipped cream, ice cream, or creme anglaise. Melted vanilla ice cream is essentially creme anglaise, that fancy whitish custardy sauce many plated desserts are served with. The microwave and some good vanilla ice cream make a really quick creme anglaise, which is awesome on this bread pudding.
  • Variations besides raisin & pecan: dark chocolate chunks and orange marmalade, white chocolate chunks and dried cranberries, cream cheese chunks and fresh berries (blueberries, raspberries and/or strawberries)

Friday, August 19, 2011

First, locate the teats on your cashew...

I've been buying almond, coconut, and/or soy milk instead of milk for quite some time now. Recently I concluded that making nut milk shouldn't be that hard and googled around for guidance. I think I have this process pretty streamlined, have stuff to say, and am ready to document it, so here goes:

Cashew Milk
Cashew milk is flipping delicious and easy to make, so if you want to try making nut milk, I highly recommend starting with cashew. If you have a kick ass blender (vita-mix, blendtec, etc.) you won't even need a nut milk bag/fine mesh to strain it, because you won't need to strain it at all.


  1. Get RAW un-dicked around with cashews. No salt, no whatever else. I buy them in the bulk bin now. You will need about 1 cup of cashews to make 3 cups of cashew milk.
  2. Soak them in plenty of water for a few hours or even overnight. You can soak them in the pitcher of your blender, so you don't dirty another thing in the kitchen. 
  3. Strain and rinse them off.
  4. Add them back to the blender pitcher and add just enough fresh cold water to cover. I use filtered water from my Brita for this.
  5. Blend on your blender's juice setting (my Blendtec starts out slow, then beats the crap out of them for maybe a minute and a half on this setting).
  6. Behold your cashew cream! Depending on what you're up to, you might need to stop here. More on that later.
  7. Add in the rest of the water (up to the 3 cup mark is a good place to start) and put the lid back on securely. I shake the pitcher at this point to basically wash down the sides.
  8. Blend again on the whole juice setting.
  9. Check it out! It looks like milk! 

At this point it tastes very very neutral, so give it a taste and adjust for the consistency you like. If it's too creamy, just add more cold filtered water. I also like to buzz in a pinch of sea salt, a tiny bit of maple syrup, a tiny bit of vanilla extract, and a tiny pinch of cinnamon. If you go overboard on that stuff, it tastes like Horchata, which is damn awesome, as well.

If you find, as I have, that you'll want to make a 3 cup batch of this every week, I recommend soaking a big batch of cashews all at once, then portioning them out into ziploc bags for the freezer. If you don't want to wait 20 minutes while they thaw a little, they can be zapped in the microwave for 30 seconds when you're ready to make milk, so the whole process from using pre-soaked, frozen cashews takes only five minutes.

Other ideas
Double Honey Nut Cheerios 
Flavor your nut milk with honey and a pinch of salt and pour over your Honey Nut Cheerios. OMG Sweet Jesus.
Honey Nut Semi Freddo
Make honey nut semi-freddo by flavoring the cashew cream with plenty of honey and a good pinch of salt and freezing it. It should be too sweet to eat before you freeze it because freezing dulls the sweetness quite a bit. I stirred it once or twice as it was freezing too. This was amazingly good. I think I'm going to try this with hazelnut cream and chocolate next.
Coffee Cream
Coffee cream can be made by adding less water than when making milk, and can, of course be flavored however you like.
Chocolate Cashew Milk
Mix 1 Tbsp. agave nectar with 1 Tbsp. cocoa powder and a pinch of salt until it looks like Hershey's chocolate syrup. Add a little cashew milk to thin and stir until dissolved. Add more cashew milk until it tastes the way you want.
Delicious Cashew Spread
Start with 1 cup of extra thick cashew cream and add 2 Tbsp. nutritional yeast, chopped fresh herbs, cracked black pepper, and garlic (or any combination of that stuff- this combo tastes a lot like Boursin cheese). Awesome on crackers, crudite, and baked potatoes.
Creamy coffee!

Friday, May 20, 2011

Crepes

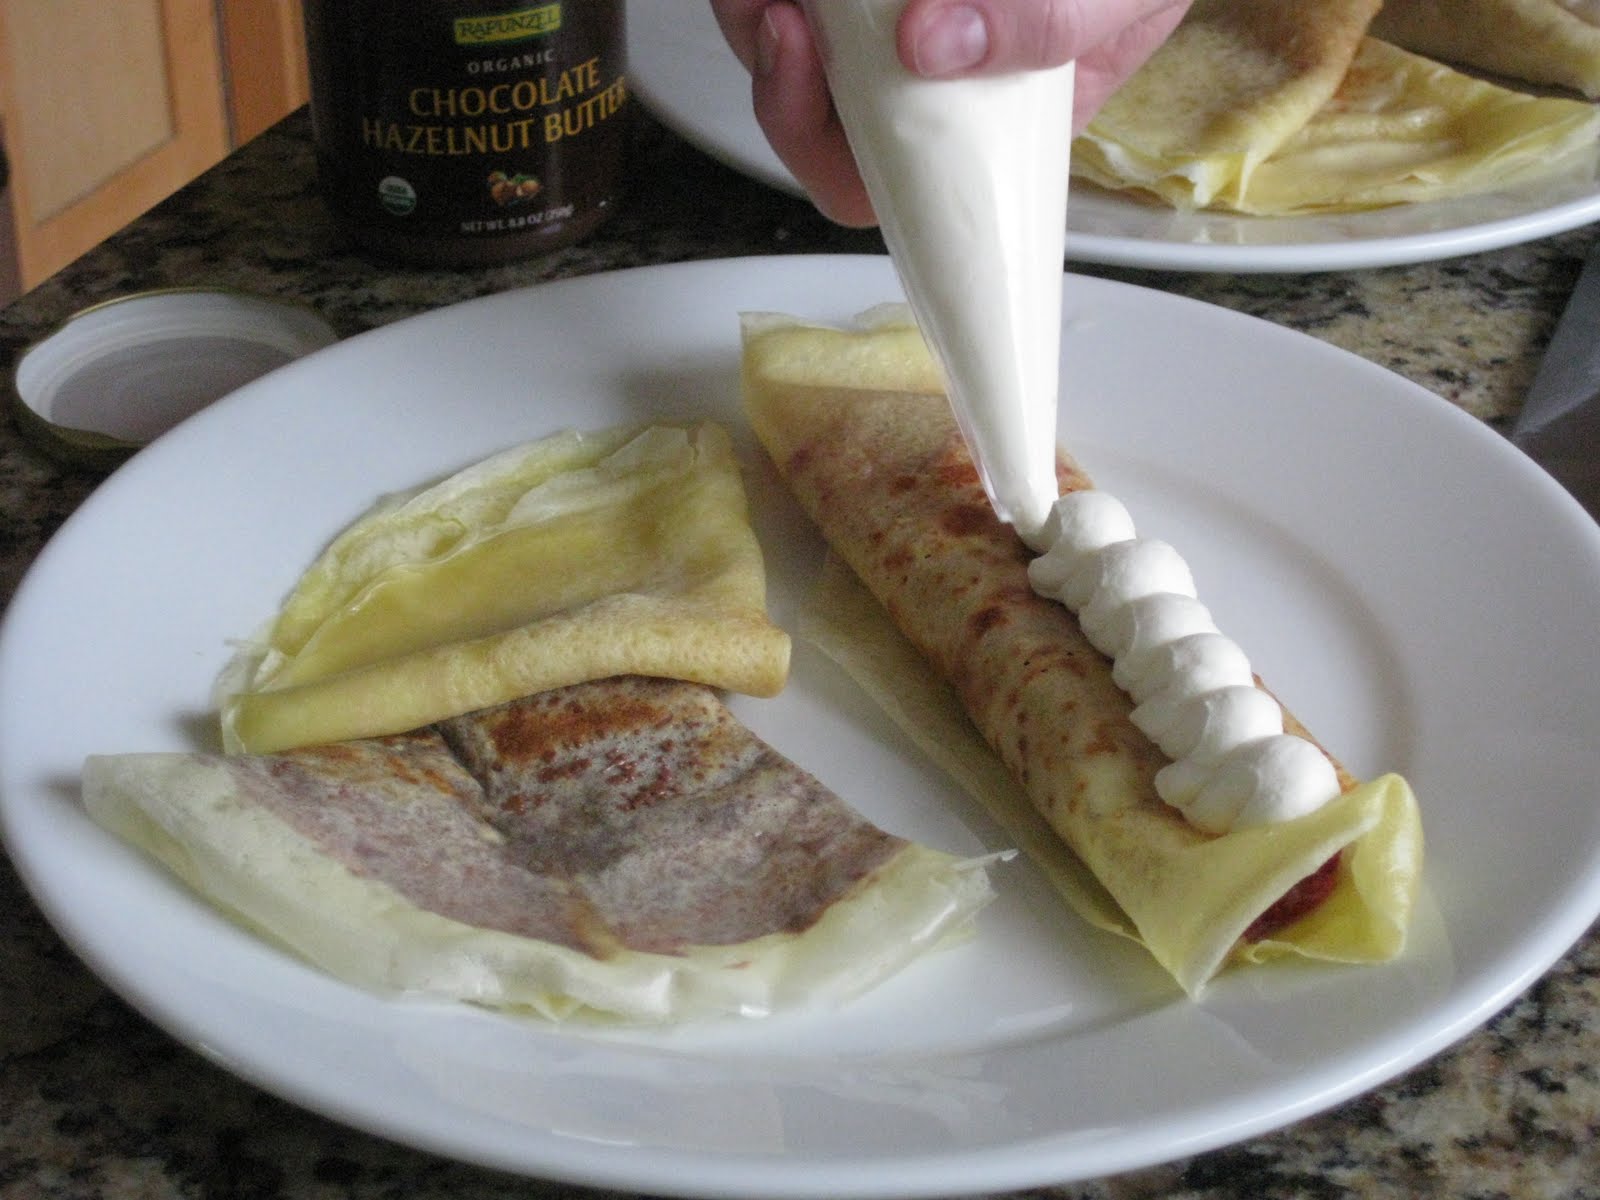
This recipe is my favorite crepe recipe because it produces the absolute thinnest crepes AND the batter doesn't need to rest because it doesn't use flour and so mixing it doesn't produce gluten. It's adapted from The Cake Bible and I've used it for years with great success. (Please pardon my bed-head, it was Sunday morning and I'd just rolled out of bed into the kitchen.)
Strawberry jam filled crepe getting dressed with whipped cream; Lemon sugar crepe; Nutella impostor crepe
Ingredients
3 eggs
1 c milk
3 Tbsp unsalted butter, melted
3/4 c cornstarch
1/8 tsp salt


For Sweet Crepes:
1 Tbsp sugar
1 Tbsp Grand Marnier


For Savory Crepes:
handful of rough chopped fresh herbs
or
1/2 tsp Dijon mustard


Clarified butter for cooking the crepes (just nuke butter until melted and scrape off/fish out the white bits, leaving clear yellow goodness)


Procedure
Place the ingredients (except clarified butter), in the order given, in a blender and blend at high speed for 30 seconds.


Heat a crepe pan on medium-high heat until hot enough to sizzle a drop of water. Brush the pan lightly with clarified butter and pour 2 tablespoons of batter into the center of the pan. Immediately tilt the pan to the left and then down and around to the right so that the batter moves in a counterclockwise direction, swirling to cover the entire pan.


For the thinnest possible crepes, pour excess batter immediately back into the blender with the rest of the batter. So, to recap: Pour in batter, swirl around fast, quickly dump extra back where it came from and return to heat. This should all happen quickly- otherwise, adjust the thing you're using to pour in your batter so you're pouring in exactly the right amount. 1/4 cup measure giving you too much batter in your pan? Try another scooper that's smaller.
Cook until the top loses it's shine and starts to dull and the edges begin to look dry and lacey, about 20 seconds. Use a small metal spatula to lift the edge, check to see if the crepe is speckled with brown underneath, then flip the crepe with your fingers and cook for about another 15 seconds.
I have a blue steel crepe pan. No Really. I use my offset icing spatula for crepes, it's thin and easy to handle.
You can fill them however you like but I like mine brushed with melted butter, sprinkled with sugar and a squeeze of lemon.
Breakfast of Champions!

Monday, January 31, 2011

Flourless Chocolate Cake

Flourless Chocolate Cake with pansies from JR Organics at the Little Italy Mercato (Farmers' Market)
There are a mere 3 ingredients in this "cake":
  • 1 lb chocolate chopped into small chunks
  • 1/2 lb (2 sticks) unsalted ROOM TEMPERATURE butter
  • 6 large very fresh eggs
This absurdly short ingredient list has 2 implications:

1) Start with the best ingredients to set yourself up for success- if your butter smells fridgey or your chocolate is not something you'd want to eat by itself or your eggs are old, you can do everything correctly and still blow this recipe.

2) How do you turn 3 liquid ingredients into something that's cakelike in appearance? It's all about technique. Screw any of that up and you're doomed. So now the recipe sounds hard- it isn't. It's what I make when I'm pressed for time because it comes together very quickly without too much fussing. Just follow the directions and you can't go wrong.

Preheat oven to 425 and set a kettle of water on to boil.

Prepare a 8" springform pan by locking in the bottom, spraying with nonstick cooking spray, and lining the bottom with a circle of parchment paper (not wax paper, or your cake will taste like crayons, and that's gross). Then cover the bottom with foil to prevent water from seeping in from the water bath you'll bake the cake in. Don't skip that step, you'll be really disappointed if you do. Put the prepared springform in a larger pan that will act as a water bath- make sure there's enough room for you to comfortably pour the boiling water without worrying you'll get any in the cake.

Melt the chocolate in a big bowl in the microwave by zapping for 30 seconds the first time and stirring, and then 15 seconds and stirring, repeating the 15 seconds and stirring procedure until some lumps of chocolate remain but it's mostly melted.

Add the butter and stir to combine until no lumps of butter or chocolate remain. You may need to zap the butter chocolate mixture for 15 seconds one more time. The goal here is to not f*ck up your chocolate- there's two ways of doing that- getting it too hot (which is not really very hot, chocolate scorches at a temp you'd consider warm) or getting a drop or two of liquid in it. So don't rush and zap for longer because it doesn't seem "hot" to you. Trust me.

You can also do that whole procedure in a bowl over a simmering pot of water, but now you're asking for trouble with the drop or two of liquid thing and you have to stand over it and stir...and this is supposed to be easy. I prefer the microwave.

Once your chocolate and butter are velvety smooth, move on to the eggs. Crack them into the bowl of your standing mixer (cake robot) and set it over a pot of barely simmering water. Whisk by hand until the eggs are warm to the touch, which takes about 6 minutes. Don't leave them alone for a second, you have to whisk constantly or your eggs will have little lumps of scrambled egg in them. Ick.

When the eggs are warm, hook the bowl up to the mixer with the whisk attachment and whip on high for about 5 minutes. The eggs will have tripled in volume and will reach the soft peak stage.

Fold 1/3 of the egg into the chocolate until almost uniform in texture. Then fold in 1/2 of the remaining mixture very gently until almost uniform in texture. Fold in the remaining egg very gently just until no streaks remain. Your goal here is to not lose any loft or volume from the air in the eggs but not to have a cake with streaks of egg or gooey chocolate.

Pour batter into the prepared springform pan and smooth with a spatula. Put the water bath pan/springform combo onto the middle oven rack and pour hot/boiling water into the water bath so that it comes up about 1 inch on the side of the springform, being careful not to get any on the cake.

Bake 5 minutes. Cover loosely with foil and bake an additional 11 minutes.

When it comes out of the oven it will look undercooked and wiggly. It's fine. Cool on a rack for 30 minutes then transfer to fridge for at least 3 hours before trying to remove it from the pan. Run a spatula/knife around the edge before releasing the spring or you'll crack the cake.
Serve at room temperature with fresh vanilla whipped cream.