Showing posts with label Chiles. Show all posts

Tuesday, November 29, 2011

Blistered Shishito Peppers with Smoked Sea Salt

I tend to grow chiles in the garden (or Earthbox, usually) that are too hot to eat a lot of. Trouble is, pepper plants produce a TON of chiles, so I toddle outside throughout the season and collect a Serrano (or habanero or jalapeno or black cobra chile) or two for whatever dish I'm making and the rest of the thousands of chiles I grow are destined to be harvested, frozen, and eventually turned into hot sauce. Bell peppers are just okay for me, and anchos are kind of huge to just eat.
A few years ago, I was at Wine Vault & Bistro in Mission Hills and the waitress recommended Shishitos, since they were in season and kind of a rarity.

Holy.
Freaking.
Crap.

No, they're not spicy. OK, it's a little like Russian Roulette- about one pepper in 50 is spicy- but that's fun, right?

These are my favorite fried finger food type thing ever. These beat out french fries, calamari, onion rings, jalapeno poppers and anything else you can think of in this terribly guilt inducing fried finger food category. And here's the best part- they're not NEARLY as bad for you as any of those. They're not breaded, they don't need to be dipped in anything. They're like a fry that doesn't need ketchup and isn't made of starch! They're healthier and actually taste better than the unhealthy alternatives you're used to. And they're waaaaay less labor intensive to make- in fact, they whip up in about 5 minutes. When does that ever happen? Never, that's when.

Ingredients
Handful of shishito peppers with stems left on (can be found readily in asian markets when in season)
2 Tbsp peanut oil
2 big pinches of finishing salt (whatever you like to use when you really want the salt to be special/not something you'd dissolve into food- I have an applewood smoked sea salt from Dean & Deluca that I love with these)

Procedure
Heat the oil in a shallow saute pan until shimmering but not smoking.

Add the peppers (make sure they're dry or you'll have scary hot oil spattering everywhere) and give the pan a shake so they spread out.

Leave them alone for 30 seconds, then give them another shake. Leave them alone another 30 seconds, then use your tongs to check one. It should look like the skin is blistering/beginning to char a little. Once that happens, flip the peppers over and cook this way, shaking and flipping until they're nicely blistered. It should take no more than 5 minutes- you don't want them cooked all the way through to the point that they're completely floppy.

Remove from the pan onto paper towels and drain. Sprinkle well with salt, plate, then give them another hit of salt. Don't eat the stems, and try not to burn your mouth. :)

Wednesday, August 31, 2011

Chile de Arbol Salsa

Right after pouring on the boiling water, the water gets a little yellow. The water will look like tea after an hour.

Ingredients
1 c. Chiles de Arbol, seeds shaken out
2 c. boiling Water to soak chiles
1/2 cup vinegar (red wine, white wine, cider, and rice vinegar are all good, even white vinegar will work)
1 tsp. ground Mexican Oregano
2 cloves Garlic
2 tsp. Salt 


Procedure
The procedure for making chile paste is outlined in detailed in this post, where I used Ancho chiles. But what you'll want to do, simply, is pour the boiling water over the chiles and allow them to soak for about an hour. Then drain off enough of the soaking liquid so that there's enough for your blender to "catch," and puree the chiles to make chile paste.
Add the vinegar, oregano, garlic and salt and puree again. Adjust for consistency and taste. If it's too acidic and too thick, you can add water instead of more vinegar.

Wednesday, May 18, 2011

Guajillo Chile Black Bean Street Tacos

I've recently gotten back from a Caribbean cruise where I ate waaaaay too much "cruise food" and needed to detox. To me, this generally means cutting down the drinking a whole lot and only eating minimally processed fruits and veggies (no refined flour, no dairy, no eggs, no meat). Today marks the start of my third week eating what is essentially a vegan diet with some extra restrictions on processed food/complex carbohydrates. I've been eating well; don't cry for me, Argentina! 


Usually street tacos are tiny things full of mostly meat, with few toppings, (carne asada tossed with spicy sauce and topped with onion and cilantro and a lime to squeeze on top is pretty classic) but I wanted to create something that wasn't too gringo but still lightened things up for a busy weeknight. 
Served family style, with individual plates of mexican-style corn on the cob and chile lime fruit cups
Taco Filling Ingredients
2 tsp oil
1/4 diced onion
2 garlic cloves (pressed through a garlic press)
2 Tbsp Guajillo chile paste
1 Tbsp chili powder
1 15 oz. can of no salt added black beans, undrained, unrinsed


Toppings
1 finely diced small tomato
1/2 avocado, sliced 1/8th inch thick
1 large serrano chile sliced into long thin strips
2 Tbsp cilantro, rough chopped
1 green onion, thin bias sliced


12 4” Corn Tortillas (tiny street taco size)


Prepare Filling
Heat oil in a medium saucepan over medium heat. Add onion, then garlic and saute until translucent, about 3 minutes. 
Add chile paste and chile powder and stir to combine and heat through. Stir in the whole can of beans (including liquid), and bring to a high simmer, stirring frequently. 
Reduce heat and let liquid reduce while you prepare the rest of your meal or prepare toppings. Beans should not be too soupy- you want them to stay put in your tacos.


Assemble
Heat 4 tortillas at a time directly over the fire if you have a gas stove flipping frequently (no pan, put the tortillas where you’d put a pan). If you don’t have a gas stove, you can wrap small stacks of tortillas in a damp paper towel and nuke for 20 seconds until warmed. Don’t skip the tortilla heating or your tortillas may tear.


Hold the warmed tortilla in one hand, add a heaping tablespoon of beans, 1 slice of avocado, 1 slice of serrano chile, a sprinkle of tomatoes, and a pinch of cilantro and green onion.


Make a meal
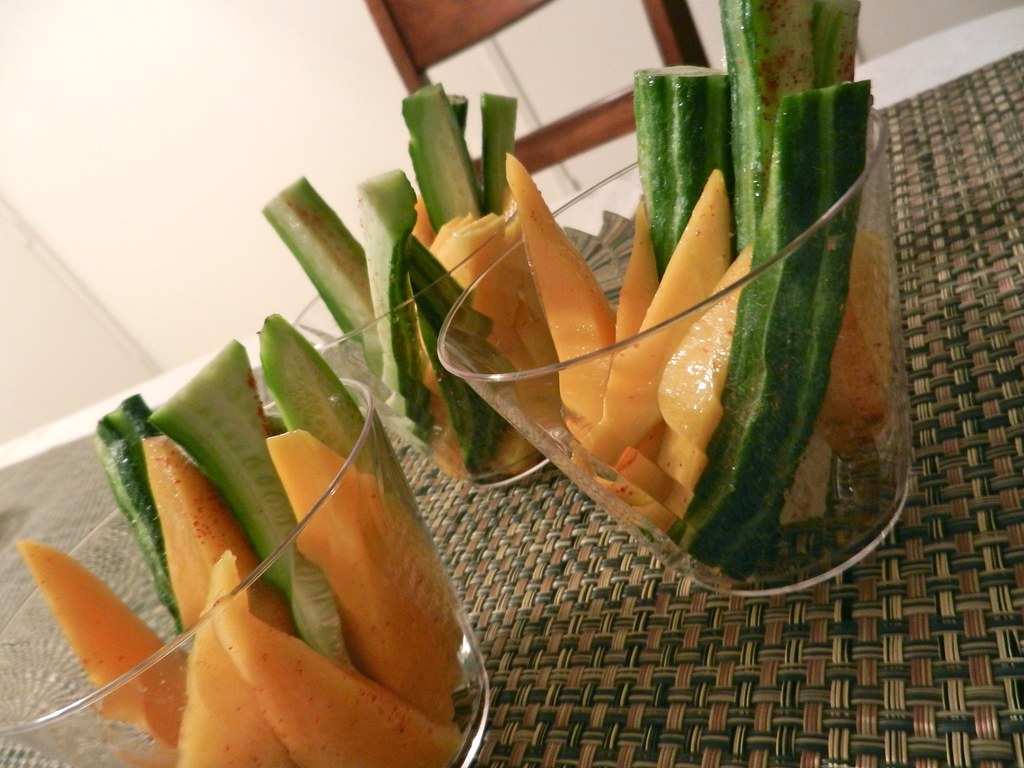
Mango & Cucumber Spears with Lime, Chile & Sea Salt
Elotes (Mexican-Style Corn on the Cob)

Mango & Cucumber Spears with Lime, Chile & Sea Salt

Spicy, sweet, crunchy, tangy, AND salty!
Refreshing fruit salads like this are often available at farmer’s markets here and from street vendors in Mexico. They often are served sticking out of red solo party cups and can include watermelon, jicama, pineapple, melon, and papaya too!

Ingredients
1 cucumber, seeds and skin removed
1 large mango, seed and skin removed
1 lime
cayenne pepper to taste
sea salt to taste


Procedure
Slice cucumber and mango into spears and lay out to receive seasoning evenly. Sprinkle with lime juice, then add cayenne, then salt.
Tip: Add salt and spices from high above the food to distribute it better.
Gather up your spears and serve sticking up in a cup like a bouquet of flowers.

Friday, February 25, 2011

Chile Vodka Cappellini al Gamberi

Peeled shrimp ready to de-vein 
After making some delicious smokey chile pastes, I wanted to cook something right away that prominently featured my new ingredient!

I love tomato vodka cream sauce for it's bite and wondered if cutting back on the tomato and adding in plenty of smokey chile paste would work. I had some bacon that Josh and I made a couple weeks ago that would be a delicious addition to the sauce, and I also had some frozen shrimp that could definitely perch atop a pile of delicious pasta, so I set to work creating this recipe.

It wasn't difficult (great week night food) and the smokiness of the chiles really complimented the bite from the vodka in the sauce.
Mise En Place
Chile Vodka Cappellini al Gamberi
angel hair pasta with shrimp


Ingredients
1/4 lb. Bacon
small yellow onion, diced
4 Garlic cloves minced/pressed through a garlic press
28 oz can of whole tomatoes
1/2 c. Pasilla chile paste (Ancho would work too)
1/2 c. cream
1/2 c. vodka
1 Tbsp olive oil
raw shrimp, peeled and deveined
1 lb. angel hair pasta
Salt
Pepper
Basil chiffonade for garnish


Oh, bacon lardons! Delicious house-cured pork bellies! 

Rendering the bacon fat to saute the veggies in
Set a large pot of salted water on to boil for the pasta.

Cut the bacon into 1/2" rectangular pieces (lardons) and add to a cold saute pan. Turn on the heat to medium, and allow the fat to melt, being careful not to burn the lardons.

Add the diced onion and saute until translucent, about 3-5 minutes. Add the garlic and stir to combine. Add the whole tomatoes, squishing them in your hands as you remove them to the can/add them to the pan, then dump in the juice from the can. Add the chile paste and increase heat to high and bring the sauce to a boil, stirring frequently.

Sauce ready to go in the blender
Turn off the heat and add the sauce to the blender, buzzing until smooth. Return the sauce to the pan over low heat and add the cream and vodka. Stir to combine and set aside while you prepare the pasta and shrimp.

Heat grill or grill pan to medium heat.

Add pasta to boiling water.

Toss the shrimp with olive oil, salt and pepper. Add the shrimp, let cook for 2 or 3 minutes, until tails turn pink and meat starts to lose it's translucency. Flip each shrimp and cook another minute. Remove pan from heat.

Tails turning pink and meat just beginning to become opaque. Time to flip! Elapsed time on the pan: 2 minutes.
 Drain pasta when done (just about 6 minutes) and add to the sauce, tossing to combine.  Taste for seasoning, plate pasta, add shrimp, garnish & serve!
Chile Vodka Cappellini al Gamberi

Monday, February 21, 2011

Chile Paste

Inside an Ancho Chile
I saw another great idea in Mike & Sherry's Menu In Progress blog that I knew I had to try when I saw that huge bags of dried chiles were on sale at the store. Chile paste could definitely come in handy around the house. I picked up big bags of Anchos (smoked Poblanos that have a raisiny sweetness to compliment their smokiness) and Guajillos (dried Mirasol chiles that are mild and toasty) that were so cheap, they were practically free. I spread them out on their own sheet pans and toasted them for 10 minutes in a 400 degree oven first, let them cool, and then seeded them half-assedly- a few seeds are not worth worrying about, so whatever came out when I ripped off their stems and shook them, was good enough for me.

Next I soaked the chiles in very hot water from the tap for as long as it took to watch a couple episodes of 30 Rock. Half an hour probably would have been enough. I scooped them out of the water and into the blender, then added about a cup of the soaking water (now very dark brown) so that the puree would not be too thick and the blender would blend nicely.
Will It Blend?!

Smooth, but not too smooth Ancho chile paste
Without salt or vinegar, this isn't really a condiment so much as an ingredient- an easy way to pre-process dried chile pods so they're ready to go when you need them in a recipe- but I bet they could morph into some pretty great sauces with just a few extra additions.