Showing posts with label Building Blocks. Show all posts

Thursday, September 15, 2011

Home-Cured Bacon

Curing bacon at home is easy, don't tell anyone
Ingredients
2 lb pork belly
1/8 cup kosher salt
1 tsp pink curing salt
2 Tbsp black pepper
2 bay leaves, crumbled
1/4 tsp fresh ground nutmeg
1/4 cup brown sugar, honey, agave nectar, or maple syrup
2 cloves of garlic, smashed
1 Tbsp juniper berries (optional)
5 sprigs fresh thyme (optional)
1/4 tsp red chile flakes (optional)

Procedure
Put everything but the belly and the sweetener in a 2 gallon zip top bag and mush it around.

Add the sweetener you’ve chosen and mush again.

Add the belly and rub it all up, making sure it has good contact with the goodies in the bag. Push all the air out by folding/rolling the bag over the belly, zip the top and put it in the fridge. After a few hours, check it and give it another good mushing, it will be easier this time because the cure will be liquified & the belly will have released some moisture.

I turn the belly once a day when I go into the fridge, but at a minimum, turn it after day 3, but just let it hang out in the fridge for a total of 7 days. 

After 7 days, you’ll notice the belly will be stiffer, it’s cured!

Take it out of the bag and rinse it off. Put it in a 200 degree oven for an hour and a half. 

Congratulations! It’s a BACON!

To cook a lot of slices at once, preheat oven to 400 and lay strips of bacon on a sheet pan. Cook for 8 minutes, then rotate pan and cook 8 to 10 minutes more until crispy and brown and bacony. Transfer to a pile of paper towels to drain.

ProTips
  • Pink salt is POISONOUS. For realz, don’t accidentally eat this stuff.
  • Pink curing salt is not the same as the pink colored Himalayan salt you find at fancy markets. Pink curing salt is sodium nitrite
  • If you have a smoker, swap out the 200 degree oven portion for an hour and a half in there with whatever wood you like (Maple syrup cured works well with maple wood; I like applewood with honey cured bacon; I like pecan wood with brown sugar cured bacon.)
  • Google “lardons” and prepare to weep with at beauty that is the lardon.
  • Bacon grease is fantastic to cook stuff in, don’t waste it.
  • Carve off slices as needed, rather than slicing it all up at once (unless you’re going to freeze it). Remember: less surface area = slower spoilage rate.

Friday, September 2, 2011

Obligatory Satan/Seitan Pun Here

What are those, pork chops? No! They're vegan mock meat cutlets called Seitan, and they're very tasty.

I really like seitan but the pre-packaged stuff is pricey for something that I heard was easy to make. And so I set about making some, and found that it was super easy indeed. And delicious too. I don't think I'll ever buy it again, in fact.

Ingredients

  • 6 cups vegetable broth (I make mine from scratch or using this vegetable soup base from Penzey's)
  • 1 onion roughly chopped
  • 1 cup vital wheat gluten
  • 1 tsp ginger powder
  • 2 cloves minced garlic (or squish in press)
  • 3/4 cup vegetable broth
  • 2 tbsp soy sauce
Procedure
Bring 6 cups of vegetable broth to a simmer and add onion.

Mix gluten, ginger and minced garlic thoroughly- you'll have trouble mixing them in once the liquid gets added. Add 3/4 c. vegetable broth and soy sauce and mix to combine. I used my KitchenAid stand mixer for this, but anything less probably will struggle/burn out, so if you don't have one, use a strong spoon until it comes together enough that you can turn it out and knead it. Knead for a minute at a time, by hand, or 30 seconds at a time in the mixer, and rest for 2 minutes between and knead again. It will wind up looking and feeling like chewed lumpy bubble gum.

Portion the dough into 6 pieces and roll out into cutlets about half an inch thick with a rolling pin. Focus on thinning the center of the cutlets a little more than the edges because they'll puff and swell with cooking, and don't worry that there's tears or holes in the dough.
Simmering in broth

Add the cutlets to the simmering broth, cover and simmer for 1 hour and 15 minutes. I used a pressure cooker and cooked them for 45 minutes.

Once they're done, you can use them like you would use a piece of meat. They're fully cooked, but if you want to do additional things to them, that's fine too. Once mine were done simmering, I chopped up a cutlet into cubes, sauteed them with a bit of oil in a pan to get some nice brown and crispy bits, tossed it with hot sauce and made myself some DELICIOUS little tacos.
Spicy Seitan Street Tacos with Salsa de Arbol and fresh homemade tortillas 

The cutlets also freeze very well, so just let them cool and slip into ziploc bags to freeze. Then you can pull them out and bread and fry them like chicken fried steaks, make seitan parmesan, use them as a patty on a sandwich, cube them up to make something like a curried chicken salad...whatever your heart desires.

Wednesday, August 31, 2011

White Sauce for Fish or Feesh Tacos

Feesh Taco (fried tofu)
Ingredients
1 part Mayo (I use vegenaise when I'm veganizing this)
2 parts Yogurt (I use So Delicious cultured coconut "yogurt" when I'm veganizing this too)
squeeze Lime Juice 
1 garlic clove, minced
big pinch Salt 
dash Hot sauce or Adobo (Open a can of chipotle chiles en adobo and dig out a teaspoon of the sauce- that's adobo)

Procedure
Just mix it all together and put on your fish tacos, or your feesh tacos (my fake vegan version with fried tofu replacing the fish)


Chile de Arbol Salsa

Right after pouring on the boiling water, the water gets a little yellow. The water will look like tea after an hour.

Ingredients
1 c. Chiles de Arbol, seeds shaken out
2 c. boiling Water to soak chiles
1/2 cup vinegar (red wine, white wine, cider, and rice vinegar are all good, even white vinegar will work)
1 tsp. ground Mexican Oregano
2 cloves Garlic
2 tsp. Salt 


Procedure
The procedure for making chile paste is outlined in detailed in this post, where I used Ancho chiles. But what you'll want to do, simply, is pour the boiling water over the chiles and allow them to soak for about an hour. Then drain off enough of the soaking liquid so that there's enough for your blender to "catch," and puree the chiles to make chile paste.
Add the vinegar, oregano, garlic and salt and puree again. Adjust for consistency and taste. If it's too acidic and too thick, you can add water instead of more vinegar.

Thoughts on Taco Assembly


Thanks to Jennifer Jean Lee for taking such great photos of my class!
Taco assembly is obviously not rocket science, but there are some things that will make the process go more smoothly. 
  • If you want hot tacos, don’t put them on cold plates. You can warm plates in a warm oven. 
  • Get all of your toppings, sauces, tortillas and sides ready, within easy reach, in order, room temp or hot as appropriate. Mise en Place! 
  • The order of operations should be: Tortilla, meat, sauce, veggies. Assemble them all the same, uniformity is more striking than each taco being a special snowflake. 
  • Don’t get cute and put lettuce, cheddar shreds, or sour cream on these- Tapatio/Cholula or Arbol salsa and a squeeze of fresh lime is all that authentic tacos need. 
  • If plating, you can prop two tortillas up “back to back” or wrap in non-absorbent paper. Alternatively, serve family style with tacos all in a line, using the tacos to hold each other up in taco formation. 
  • You are not 5 and your foods can touch each other, food looks stupid segregated on a plate.

Apartment-Style Carne Asada (Tacos)


You may not have a grill, but you probably have a broiler (you may not know where it is, but that’s a different problem) and can use it to great effect to make delicious meat.

Ingredients
1 lb. hanger steak, flat iron steak, or ask your butcher what they've got for you if you're making carne asada 
1/4 c. olive oil
2 cloves garlic, minced
Juice of 2 limes
1 Tbsp salt 
1 Tbsp dried oregano
1 Tbsp ground coriander
1 Tbsp ground cumin
Many grinds of Pepper
Pinch cayenne


Procedure
Toss everything but the meat in a big ziploc, and mush to combine. Open the bag and insert meat. Zip up most of the way, then roll to push out air and zip closed. Marinate overnight or for as long as you have, you non-planning ahead slacker!

Preheat your broiler for a few minutes, and while that’s happening, line a BROILER SAFE pan with foil. Lay the meat out on the foil and broil for 7 minutes or so (you want some charred bits, more than you think are reasonable), then take it out, flip it and broil for another 6 minutes, until it looks awesome.
Take it out and leave it the F alone. Seriously. Don’t touch it, don’t even look at it for 5 more minutes. Think this step isn’t necessary? Why’d I write it then? Your meat is still cooking, this is part of the cooking process, so if you bothered to follow the directions and cook it, freaking DO this.
Chop it up into desired shapes and sizes and OMNOMNOM.
Taking a first pass at slicing against the grain on the bias
ProTips
  • Slice against the grain. Always. If you’re going to cut in both directions, use a diamond pattern, rather than square, so you’re never cutting directly with the grain.
  • If you do have a barbecue, by all means, use it. Instead of the broiler, just grill over high heat (covered) for 6 minutes per side. Flip it once and don’t poke it or smash it.
  • For your carne asada tacos, toss diamond shaped chunks with arbol salsa to make a spicy delicious meat mixture.
Tacos 101
For Traditional Carne Asada Tacos, assemble in this order:

Carne Asada (I like to toss the meat with the onion and salsa before putting in the tortilla)
Onion
Cilantro
Serve with lime wedge

Friday, August 26, 2011

Authentic Handmade Corn Tortillas


For neater edges, add more water and be sure to wet your hands before rolling dough into balls

If you think you don’t like corn tortillas, it’s because you’ve never had a handmade tortilla that’s still too hot for any sane person to eat. I don’t like packaged corn tortillas either, they taste like cardboard with a texture like sand. They’re cheap and quick to make at home- faster than going to the store for tortillas.

Ingredients
Maseca brand masa flour
Salt
Water

Procedure
This is stupid easy. You follow the directions on the bag with some minor modifications. Double the salt and use boiling water instead of warm. 

Mix your dough with a dough scraper or spoon and then switch to kneading by hand until it’s smooth and not sticky. 

Roll it into a log, then cut into even pieces for the batch you’re making. 

Once your log is cut into discs, wet your hands a little and roll each piece into a ball. Cover your collection of balls with a damp paper towel. 

Heat a nonstick skillet over medium heat, and if you’ve got more than one, fire ‘em up! You can cook a whole batch in no time at all.

I don’t have a tortilla press, honestly every time I’ve used one I’ve screwed it up in some new and different way. Just use a gallon ziploc bag, cut so it opens like a book and 2 big heavy hardback books. Put the first book on your counter, then lay the ziploc on top and open it up like a book. Put one dough ball in the center of the ziploc, close your ziploc “book” to cover, then top with the other heavy book and press down hard! Or move the whole setup to the floor and stand on it. Take off the top book and peel one side of the ziploc off the dough, then peel the other side off the dough.

Toss your uncooked tortilla in the pan and cook for 1 minute, flip (quit your whining and just use your fingers, everything else sucks.) and cook for 1 minute more.

ProTips
  • Don’t try to peel the tortilla off the ziploc, peel the ziploc off the tortilla or it will rip! 
  • If you preheat your oven to its lowest setting, then turn it off, you can stack your tortillas in there as they come off the stove and they’ll stay warm. Cover them with a damp paper towel.
  • These are fantastic with butter, but Chili honey butter is AMAZING (butter, chili powder, honey, nuke in microwave for 10 seconds and stir together)
  • To freeze, stack between pieces of parchment, allow them to cool completely, then slide into a big ziploc and freeze flat. To defrost, nuke tortillas for 10 seconds at a time, flipping after each zap, until hot (about a minute). A big batch can be wrapped in foil and heated in the oven.


Monday, August 22, 2011

Vegan Katsu Dinner

Japanese dinner comes together quickly if your freezer and pantry are well stocked

This dinner was made up of a bunch of little things. I prefer to eat this way, with just a few bites of each dish and lots of variety.

The revelation for me was using spicy boca chick'n patties as my katsu (cutlet). Once I heated the patty up in a skillet, toasting the breading in the process, and sliced it up with katsu sauce (kinda like a bbq sauce, recipe follows), this dish was exactly like regular ol' tonkastu- maybe lighter and less greasy!

I served my katsu with:

  • Zaru cha soba - cold green tea buckwheat noodles. Be sure to rinse/wash well with plenty of cold water after cooking. This was simply tossed with sesame oil and toasted sesame seeds. 
  • Inarizushi - the two pouches made of fried tofu skin, stuffed with sushi rice. (recipe follows)
  • Seasoned Tomato - fresh tomato slices sprinkled with Penzey's buttermilk ranch herb mix- a weird choice, I know
  • Seaweed salad with cucumber and red onion (recipe follows)
  • Edamame with smoked sea salt - nuke frozen soybeans and a Tbsp. of water in a covered dish in the microwave
  • Gari - young sweet pickled ginger, like you'd get with sushi
  • Umeboshi - pickled plum with a strong flavor- I like to nibble a little before taking a bite of inarizushi


Katsu Sauce
Mix together:

  • 1/2 c. Ketchup
  • 1 Tbsp. Worcestershire sauce
  • 2 Tbsp. Soy Sauce
  • 1 tsp. Dry Mustard Powder
  • 1 tsp. Sriracha sauce


Sushi Rice Dressing
Mix together:

  • 2 Tbsp. Rice vinegar
  • 2 Tbsp. water
  • 2 tsp. agave nectar 

Pour over 2 cups of cooked white short grain rice (I use Botan Calrose) and toss gently to coat each grain of rice with the dressing and cool it down quickly.

Seaweed Salad with Cucumber and Red Onion

  • 2 Tbsp. sliced wakame or seaweed of your choice, reconstituted in cold water (5-10 minutes)
  • 1/2 inch of cucumber
  • red onion
  • 1 Tbsp. rice vinegar
  • 1 Tbsp sesame oil
  • 1 tsp. soy sauce
  • 1/2 tsp. agave nectar
  • salt to taste 

Shave red onion with the thinnest setting of a mandoline/japanese slicer until you have about 1 Tbsp of onion ribbons. Microwave on high for 30 seconds in a dish full of water. Drain and pat dry. This process takes a lot of the harsh bite out of raw onions.
Shave cucumber on the same setting.
Stir together remaining ingredients to make dressing and toss with seaweed, onion and cucumber.

Friday, August 19, 2011

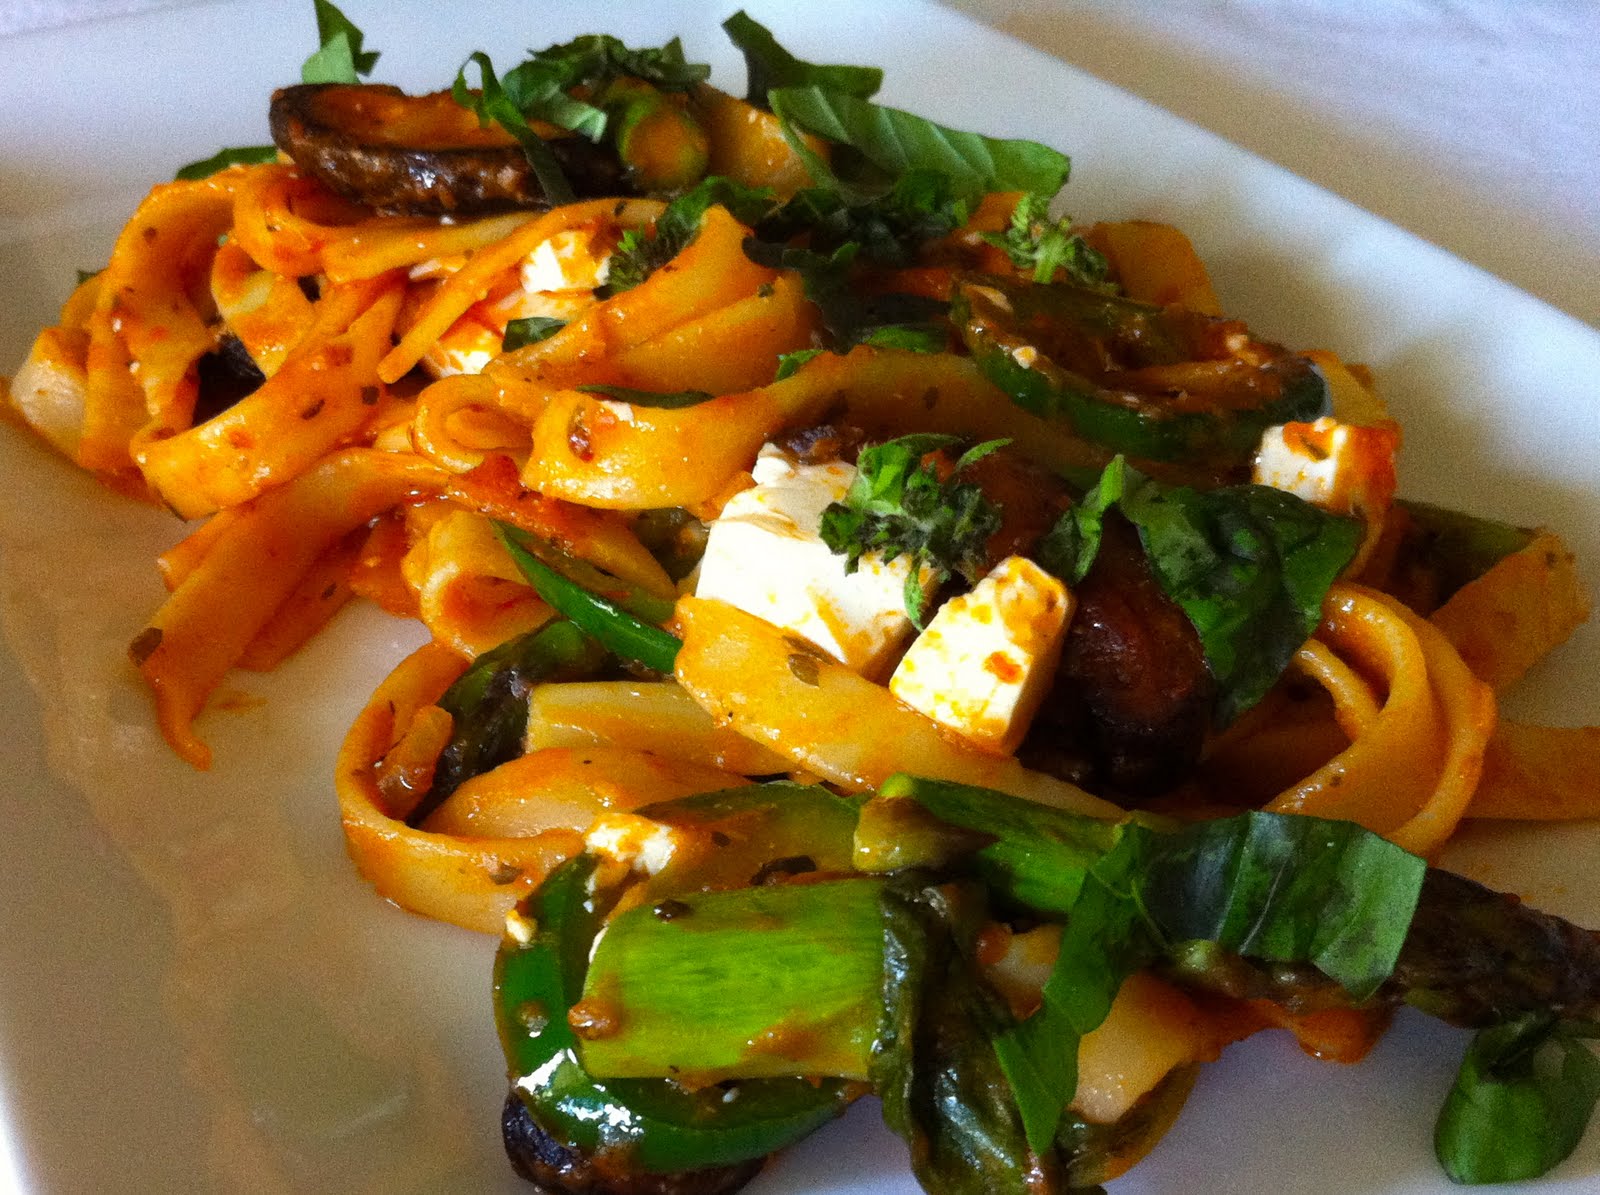
Fettuccine Arrabiata with Asparagus, Shiitake Mushrooms and Mock Mozzarella

Lunch of the gods

  • 1 serving Cooked Fettuccine
  • 1/2 c. Marinara Sauce (recipe follows)
  • 2 oz. Mock fresh mozzarella cubes (recipe follows)
  • 1 Jalapeno pepper, seeded and sliced
  • 4 shiitake mushrooms 
  • 2 asparagus spears, sliced into 1 inch pieces
  • 1 tsp. red chile flakes
  • 1 Tbsp. olive oil
  • salt and pepper to taste
  • Fresh basil garnish


Heat a large pan over medium heat and add olive oil. Saute mushrooms until well cooked, about 5-10 minutes. Add jalapenos and asparagus and saute until barely cooked/still crunchy, about 3 minutes. Stir in red chile flakes and marinara sauce and heat through. Add cooked pasta and stir to combine and heat through. Add mock fresh mozzarella cubes and heat through. Taste and adjust with salt and pepper. Serve with fresh basil garnish.

Marinara Sauce
1 14 oz. can Crushed Tomatoes
1/4 c. finely diced onion
1 big clove garlic, minced/pressed
2 tsp. Dried Italian Oregano
1 tsp. Dried basil
1/2 tsp. Dried Thyme
olive oil
salt

Heat a skillet over medium heat and coat the bottom with a little olive oil. Add onion and saute until translucent (3 minutes). Add garlic and herbs and stir to combine. Stir in tomatoes and raise the heat to bring to a boil, stirring often. Once boiling, lower heat to low and simmer for 30 minutes. Taste and add salt.

Mock Fresh Mozzarella
1 block firm tofu
2 tsp. salt
juice from 1 lemon
1 c. cold water

Press firm tofu for 30 minutes between plates, cutting boards, whatever. Combine water, lemon juice and salt in a ziploc bag, add tofu, and marinate for 30 minutes. Slice into 1/2 inch cubes.

First, locate the teats on your cashew...

I've been buying almond, coconut, and/or soy milk instead of milk for quite some time now. Recently I concluded that making nut milk shouldn't be that hard and googled around for guidance. I think I have this process pretty streamlined, have stuff to say, and am ready to document it, so here goes:

Cashew Milk
Cashew milk is flipping delicious and easy to make, so if you want to try making nut milk, I highly recommend starting with cashew. If you have a kick ass blender (vita-mix, blendtec, etc.) you won't even need a nut milk bag/fine mesh to strain it, because you won't need to strain it at all.


  1. Get RAW un-dicked around with cashews. No salt, no whatever else. I buy them in the bulk bin now. You will need about 1 cup of cashews to make 3 cups of cashew milk.
  2. Soak them in plenty of water for a few hours or even overnight. You can soak them in the pitcher of your blender, so you don't dirty another thing in the kitchen. 
  3. Strain and rinse them off.
  4. Add them back to the blender pitcher and add just enough fresh cold water to cover. I use filtered water from my Brita for this.
  5. Blend on your blender's juice setting (my Blendtec starts out slow, then beats the crap out of them for maybe a minute and a half on this setting).
  6. Behold your cashew cream! Depending on what you're up to, you might need to stop here. More on that later.
  7. Add in the rest of the water (up to the 3 cup mark is a good place to start) and put the lid back on securely. I shake the pitcher at this point to basically wash down the sides.
  8. Blend again on the whole juice setting.
  9. Check it out! It looks like milk! 

At this point it tastes very very neutral, so give it a taste and adjust for the consistency you like. If it's too creamy, just add more cold filtered water. I also like to buzz in a pinch of sea salt, a tiny bit of maple syrup, a tiny bit of vanilla extract, and a tiny pinch of cinnamon. If you go overboard on that stuff, it tastes like Horchata, which is damn awesome, as well.

If you find, as I have, that you'll want to make a 3 cup batch of this every week, I recommend soaking a big batch of cashews all at once, then portioning them out into ziploc bags for the freezer. If you don't want to wait 20 minutes while they thaw a little, they can be zapped in the microwave for 30 seconds when you're ready to make milk, so the whole process from using pre-soaked, frozen cashews takes only five minutes.

Other ideas
Double Honey Nut Cheerios 
Flavor your nut milk with honey and a pinch of salt and pour over your Honey Nut Cheerios. OMG Sweet Jesus.
Honey Nut Semi Freddo
Make honey nut semi-freddo by flavoring the cashew cream with plenty of honey and a good pinch of salt and freezing it. It should be too sweet to eat before you freeze it because freezing dulls the sweetness quite a bit. I stirred it once or twice as it was freezing too. This was amazingly good. I think I'm going to try this with hazelnut cream and chocolate next.
Coffee Cream
Coffee cream can be made by adding less water than when making milk, and can, of course be flavored however you like.
Chocolate Cashew Milk
Mix 1 Tbsp. agave nectar with 1 Tbsp. cocoa powder and a pinch of salt until it looks like Hershey's chocolate syrup. Add a little cashew milk to thin and stir until dissolved. Add more cashew milk until it tastes the way you want.
Delicious Cashew Spread
Start with 1 cup of extra thick cashew cream and add 2 Tbsp. nutritional yeast, chopped fresh herbs, cracked black pepper, and garlic (or any combination of that stuff- this combo tastes a lot like Boursin cheese). Awesome on crackers, crudite, and baked potatoes.
Creamy coffee!

Wednesday, February 23, 2011

Yogurt at Home

Yogurt is one of those things that I hate buying now that I know how easy it is to make at home. Yogurt is just milk that's been lived in by bacteria, so all you need to do is make the milk very habitable for the right bacteria, introduce the right bacteria, and let them reproduce. They do all the work, just give them a happy home!

Yogurt cheese made with this contraption
I usually do a gallon at a time, so that I've got plenty to use plain, pack into little containers with fruit jam to take to work with me, and also strain to make yogurt cheese (a great substitute for sour cream and cream cheese that is an awesome base for dips), but there's no reason you need to make that much- quantities mean very little in this "recipe."

One thing to be careful of is that you want anything that's going to come in contact with your milk/yogurt to be clean so that you're growing the bacteria you want, not some nasty bacteria that came riding in on the wind. Collecting a spoon, 1 cup dry measuring cup, glass bowl, and your thermometer and pouring boiling water over them into a bigger bowl does the trick for me.

Turn on your oven to it's lowest temp setting (mine goes as low as 180) and let it preheat.

First, pour your milk (I use whole milk because it's delicious) into a big pot and heat slowly to 180 degrees,  not letting the bottom scorch by stirring every once in a while.

A binder clip helps hold the thermometer away from the pot, leftover homemade yogurt ready to populate the new milk


Then let the milk cool to 120 degrees (you can speed this up with an ice bath, but I just go do something else for a while).

Take a small container of leftover homemade yogurt or store bought yogurt with LIVE ACTIVE CULTURES <-- those are the bacteria you need so they won't help you if they're dead, and pour into your clean glass bowl. Use the clean 1 cup dry measuring cup as a ladle to dip into your 120 degree milk and ladle onto the store bought yogurt in the bowl. Mix that together so they blend into a smoothie consistency and then pour it into the big pot of milk.

At this point, you can pop a lid on your big pot of inoculated warm milk, turn off your warm oven and pop the whole thing in for 6 hours or more, but you can also portion it out at this point....you'll see what I mean below.

The idea is to give the bacteria a warm place to multiply and do their work- hence the warm oven. Just be sure you don't leave the oven on, that would be too hot. So turn it off, and put the covered, soon-to-be-yogurt in until it's tart enough for you. After 6 hours it should be solidified like yogurt, but will be very mild in flavor, with almost no tartness at all. If you leave it overnight for 8 or 9 hours, it will be more tart, like commercial yogurt.

Recently I bought some glass jelly jars with the intention of making fruit on the bottom yogurt to take into work for lunch and that wound up being a little extra work, but very delicious and pretty!
I made the strawberry jam recipe that came with the package of pectin, using frozen strawberries and adding a pinch of salt, a splash of balsamic vinegar, and a few grinds of white pepper to zing it up a bit.

Once the jam was done, I poured a little into the bottoms of the clean jars and popped them in the fridge to firm up for a few minutes, but took them out so they could warm back up to room temperature while I made the yogurt (I didn't want cold glass jars sucking all the heat out of my warm milk mixture when I poured it in).
Jam firming up in the fridge so the second layer wouldn't disturb the pretty layer too much

Once the milk was mixed with the commercial yogurt and ready to firm up, instead of leaving it all in the big pot, I poured it gently, using a funnel, over the now firmer jelly  in the jars. Then I screwed on the lids loosely and popped them into the warmed oven to sit overnight and turn into fruit on the bottom yogurt. I can't wait to do other flavors next time!
Strawberry Balsamic Fruit on the Bottom Yogurt

Monday, February 21, 2011

Chile Paste

Inside an Ancho Chile
I saw another great idea in Mike & Sherry's Menu In Progress blog that I knew I had to try when I saw that huge bags of dried chiles were on sale at the store. Chile paste could definitely come in handy around the house. I picked up big bags of Anchos (smoked Poblanos that have a raisiny sweetness to compliment their smokiness) and Guajillos (dried Mirasol chiles that are mild and toasty) that were so cheap, they were practically free. I spread them out on their own sheet pans and toasted them for 10 minutes in a 400 degree oven first, let them cool, and then seeded them half-assedly- a few seeds are not worth worrying about, so whatever came out when I ripped off their stems and shook them, was good enough for me.

Next I soaked the chiles in very hot water from the tap for as long as it took to watch a couple episodes of 30 Rock. Half an hour probably would have been enough. I scooped them out of the water and into the blender, then added about a cup of the soaking water (now very dark brown) so that the puree would not be too thick and the blender would blend nicely.
Will It Blend?!

Smooth, but not too smooth Ancho chile paste
Without salt or vinegar, this isn't really a condiment so much as an ingredient- an easy way to pre-process dried chile pods so they're ready to go when you need them in a recipe- but I bet they could morph into some pretty great sauces with just a few extra additions.