Showing posts with label Japanese. Show all posts

Friday, April 6, 2012

Sushi Class

Its been a while since I've posted, I've been busy as hell.
I did teach a sushi class though, well, technically 3 of them, and wanted to post those recipes. It was more hands on than my normal classes, that usually only have one hands-on element. Students all made their own sushi this time, I made and served just the hot food and dessert.
Here's the pdf of all the recipes, except for the daifuku, which is below.
Back row: Toro (tuna), Ebi (shrimp), Sake (salmon) and Avocado nigiri sushi, Inarizushi, Spicy California Gunkan Maki
Front Row: Tai (snapper), Hamachi (yellowtail) with Yuzu Ponzu, serrano chile and cilantro, Sake Rose (salmon) Sashimi
For hot food we made blistered shishito peppers with smoked sea salt, garlic chile edamame, and my quick and dirty miso soup.

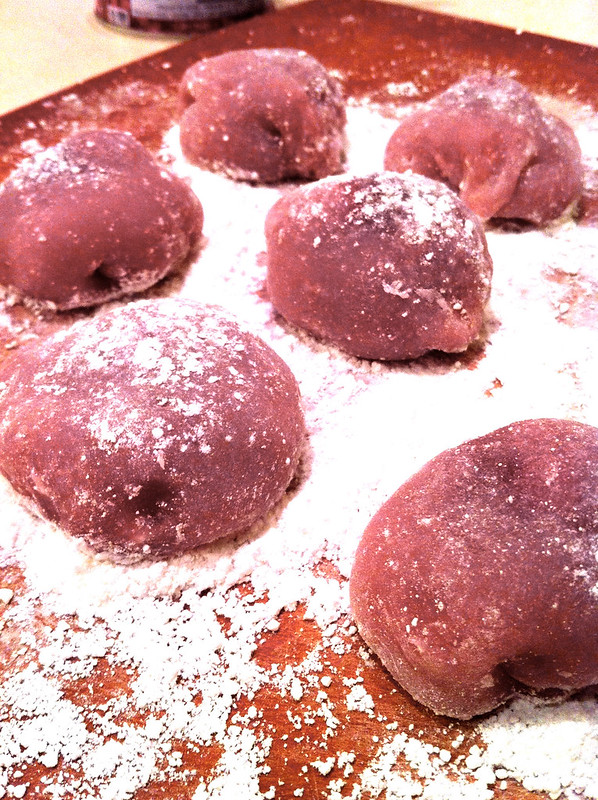
Pink Daifuku
For dessert, even though I knew I didn't have time to cover how to make them, I served homemade daifuku, a kind of mochi (sweet) that is a little unusual and class presented an excellent opportunity for me to give the students something to taste that they wouldn't normally seek out on their own. Not only is the flavor of daifuku odd for American palettes, but the texture is like nothing in our cuisine either. The best description I overheard one student give another was, "It's like gummy raw pie dough wrapped around refried beans with sugar in them." Yes, I suppose that's pretty accurate.

Daifuku Recipe

Filling Ingredients (makes enough for 2 daifuku recipes)

1 can Adzuki beans 14 oz
1/2 c water
1 c granulated sugar
1 Tbsp vegetable oil
Pinch of salt

Dough Ingredients

1 c Mochiko (white box with a blue star on it, Koda Farms brand of Sweet Rice Flour)
1/4 c granulated sugar
2/3 c water
Potato starch, for flouring the board (cornstarch works too)

Filling Procedure
Bring water and sugar to a boil and boil until sugar is dissolved and set aside to cool.
Drain and rinse the adzuki beans, and add to a saucepan over medium heat. Add oil, salt and 1/3 c of the sugar water syrup and mash the beans up with a potato masher. They should be the consistency of thick refried beans (add more sugar syrup if you need to). Heat until bean paste is hot and starts to look a little shiny. Set aside to cool.

Daifuku Procedure
Mix the dough ingredients in a microwave safe bowl (if you'd like to color them, mix in 1 or 2 drops of food coloring to the water before adding it to the rest of the ingredients- green and pink are traditional colors) making sure there are no lumps and there's no dough/residue stuck to the walls of the bowl, and cover with plastic wrap. Microwave on high for 2 minutes. Take it out and mix thoroughly. Cover it again and microwave for 1 minute more. If when you open the door, the dough deflates, it's ready. If your dough didn't inflate in the microwave yet, zap it again for another minute. It should deflate when you open the door.

Remove the dough from the microwave and scrape out onto a potato starch covered board. Pat the hot dough to flatten a bit and cover with potato starch (enough so it's not so sticky). Cut into 8 equal pieces, using a bench scraper or sharp knife covered in potato starch after each cut. Flatten out each piece a little more with your hands or a small rolling pin, working quickly, you want the dough to stay hot. Add a Tbsp or 2 of the bean filling to the middle of each piece and wrap the dough up around the filling, pinching together to seal well. The sealed part is the bottom of each daifuku. They can be wrapped in plastic wrap to stay fresh and freeze/thaw very well.

Tuesday, November 29, 2011

Blistered Shishito Peppers with Smoked Sea Salt

I tend to grow chiles in the garden (or Earthbox, usually) that are too hot to eat a lot of. Trouble is, pepper plants produce a TON of chiles, so I toddle outside throughout the season and collect a Serrano (or habanero or jalapeno or black cobra chile) or two for whatever dish I'm making and the rest of the thousands of chiles I grow are destined to be harvested, frozen, and eventually turned into hot sauce. Bell peppers are just okay for me, and anchos are kind of huge to just eat.
A few years ago, I was at Wine Vault & Bistro in Mission Hills and the waitress recommended Shishitos, since they were in season and kind of a rarity.

Holy.
Freaking.
Crap.

No, they're not spicy. OK, it's a little like Russian Roulette- about one pepper in 50 is spicy- but that's fun, right?

These are my favorite fried finger food type thing ever. These beat out french fries, calamari, onion rings, jalapeno poppers and anything else you can think of in this terribly guilt inducing fried finger food category. And here's the best part- they're not NEARLY as bad for you as any of those. They're not breaded, they don't need to be dipped in anything. They're like a fry that doesn't need ketchup and isn't made of starch! They're healthier and actually taste better than the unhealthy alternatives you're used to. And they're waaaaay less labor intensive to make- in fact, they whip up in about 5 minutes. When does that ever happen? Never, that's when.

Ingredients
Handful of shishito peppers with stems left on (can be found readily in asian markets when in season)
2 Tbsp peanut oil
2 big pinches of finishing salt (whatever you like to use when you really want the salt to be special/not something you'd dissolve into food- I have an applewood smoked sea salt from Dean & Deluca that I love with these)

Procedure
Heat the oil in a shallow saute pan until shimmering but not smoking.

Add the peppers (make sure they're dry or you'll have scary hot oil spattering everywhere) and give the pan a shake so they spread out.

Leave them alone for 30 seconds, then give them another shake. Leave them alone another 30 seconds, then use your tongs to check one. It should look like the skin is blistering/beginning to char a little. Once that happens, flip the peppers over and cook this way, shaking and flipping until they're nicely blistered. It should take no more than 5 minutes- you don't want them cooked all the way through to the point that they're completely floppy.

Remove from the pan onto paper towels and drain. Sprinkle well with salt, plate, then give them another hit of salt. Don't eat the stems, and try not to burn your mouth. :)

Wednesday, November 2, 2011

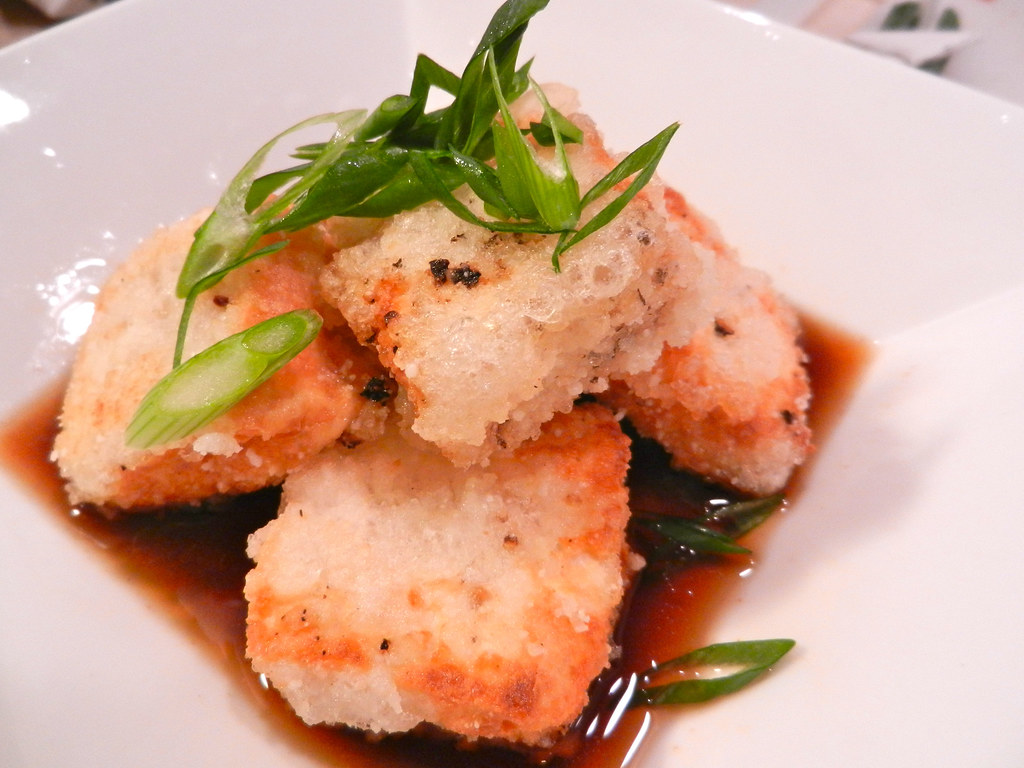
Vegan Agedashi Tofu

Agedashi Tofu is one of my favorite dishes. It's so simple and delicious. The sauce is the only thing about this that is traditionally not vegan, so it was easy to veganize without sacrificing flavor or texture or anything. The tofu should be like custard inside a light and crispy fried crust. I can never wait for it to cool and invariably burn the hell out of my mouth the first few bites.
Crispy on the outside, custardy on the inside, with a delicate, savory, sweet, and salty shiitake sauce.
1 package silken tofu (the kind that comes in the cardboard box, not the plastic water pack!)
2 Tbsp potato starch (cornstarch works fine too)
Salt & Pepper (my weird westernized preference, totally optional)
Oil for frying (I use corn or peanut)

1/2 c. vegetarian shiitake dashi (I buy granulated dashi you just add water to)
2 Tbsp. soy sauce
2 Tbsp. mirin
Green onions, sliced for garnish

Place a folded up paper towel on a plate and put the block of tofu on the paper towel. Cut the tofu with a sharp knife into cubes that you feel like you can handle without them falling apart. Small cubes are good, but they're very delicate. Gently spread out the cubes on the paper towel and drain for 10 minutes while you gather your other ingredients. Replace the paper towel by folding up another towel, laying it on the tofu cubes, place another plate on top, gently squeeze the plates together and flip the whole thing. Remove the top plate and wet paper towel that used to be on the bottom, and drain for another 10 minutes while you make the sauce.

Combine the dashi (or granules & water), soy, and mirin in a microwave safe dish and nuke for 1 minute. Stir and continue zapping, 1 minute at a time until hot.

Heat the oil to about 360F degrees. I usually don't check exact temps for frying, I just wait until the oil looks shimmery and then drop a test piece of food in to see if it sizzles how I like. You need enough oil to come up about halfway up the sides of the tofu cubes.

Put the potato or cornstarch (and salt and pepper, if using) in a container with a lid and add half the tofu cubes. Gently toss the tofu cubes so they're lightly coated. Don't do this step early- coat the tofu with the potato starch right before you fry them.

Add the tofu to the oil, try not to let them touch or they'll stick together, and fry for about 5 minutes on the first side. Then flip them over and fry for another 3-5 minutes, until they're golden brown.

Remove the tofu from the oil and drain on a paper towel. Fry the second batch and drain as well. Now would be a good time to zap the sauce for another 30 seconds to reheat. Add a few pieces of tofu to a small bowl and add some of the sauce. Sprinkle with green onion and serve.

Try not to burn your mouth. ;)

Monday, August 22, 2011

Vegan Katsu Dinner

Japanese dinner comes together quickly if your freezer and pantry are well stocked

This dinner was made up of a bunch of little things. I prefer to eat this way, with just a few bites of each dish and lots of variety.

The revelation for me was using spicy boca chick'n patties as my katsu (cutlet). Once I heated the patty up in a skillet, toasting the breading in the process, and sliced it up with katsu sauce (kinda like a bbq sauce, recipe follows), this dish was exactly like regular ol' tonkastu- maybe lighter and less greasy!

I served my katsu with:

  • Zaru cha soba - cold green tea buckwheat noodles. Be sure to rinse/wash well with plenty of cold water after cooking. This was simply tossed with sesame oil and toasted sesame seeds. 
  • Inarizushi - the two pouches made of fried tofu skin, stuffed with sushi rice. (recipe follows)
  • Seasoned Tomato - fresh tomato slices sprinkled with Penzey's buttermilk ranch herb mix- a weird choice, I know
  • Seaweed salad with cucumber and red onion (recipe follows)
  • Edamame with smoked sea salt - nuke frozen soybeans and a Tbsp. of water in a covered dish in the microwave
  • Gari - young sweet pickled ginger, like you'd get with sushi
  • Umeboshi - pickled plum with a strong flavor- I like to nibble a little before taking a bite of inarizushi


Katsu Sauce
Mix together:

  • 1/2 c. Ketchup
  • 1 Tbsp. Worcestershire sauce
  • 2 Tbsp. Soy Sauce
  • 1 tsp. Dry Mustard Powder
  • 1 tsp. Sriracha sauce


Sushi Rice Dressing
Mix together:

  • 2 Tbsp. Rice vinegar
  • 2 Tbsp. water
  • 2 tsp. agave nectar 

Pour over 2 cups of cooked white short grain rice (I use Botan Calrose) and toss gently to coat each grain of rice with the dressing and cool it down quickly.

Seaweed Salad with Cucumber and Red Onion

  • 2 Tbsp. sliced wakame or seaweed of your choice, reconstituted in cold water (5-10 minutes)
  • 1/2 inch of cucumber
  • red onion
  • 1 Tbsp. rice vinegar
  • 1 Tbsp sesame oil
  • 1 tsp. soy sauce
  • 1/2 tsp. agave nectar
  • salt to taste 

Shave red onion with the thinnest setting of a mandoline/japanese slicer until you have about 1 Tbsp of onion ribbons. Microwave on high for 30 seconds in a dish full of water. Drain and pat dry. This process takes a lot of the harsh bite out of raw onions.
Shave cucumber on the same setting.
Stir together remaining ingredients to make dressing and toss with seaweed, onion and cucumber.

Thursday, May 26, 2011

Apple Wood Grilled Hamachi Kama with Yuzu Ponzu

Hamachi (Yellowtail) Kama (Collar) is amazing. I'm having trouble even coming up with more to say. It's usually grilled and served with ponzu and is a delicious bit of fish. Kama is often unavailable because the kitchen staff eats it before it ever makes it on a menu. Like the oysters that whoever is carving your Thanksgiving turkey ate long before anyone noticed them (See? You might not even know what the hell the "oysters" are! some a-hole in your family has been hiding them from you) Kama is the ultimate ChefSnack! The collar is the cheek of the fish, and is some of the most succulent and delicate meat you will ever have. You may also see salmon collar available at some Japanese restaurants and even tuna collar very rarely. I got this one at Nijiya Market for under $4. I see it served in restaurants for around $14. Score!

Ponzu is a simple sauce or dressing made from just a few ingredients, but one is the juice of yuzu, a Japanese lemon. If you don't have one (I sure as hell don't) you can buy bottled juice from a Japanese market or substitute in your favorite citrus. I really dig orange ponzu too. For this recipe, I used the bottled yuzu juice.

Apple Wood Grilled Hamachi Kama with Yuzu Ponzu

Preheat your grill to 400 degrees, and if you have any mild smoking wood chips handy, toss some in after a 30 minute soak. I had apple, so I used apple. It ROCKED.

Make your ponzu sauce:
3 parts soy sauce
2 parts rice wine vinegar
1 part yuzu juice
dash of sesame oil

Prepare Yellowtail Collar(s):
Sprinkle the fish all over with sea salt.
Lightly brush with peanut or vegetable oil.
Throw on the grill skin side down, and close the lid. Cook for 3 minutes.
Flip the fish, and spoon a couple tablespoons of ponzu sauce on the skin side of the fish (now facing up). Close the lid again, and cook another 2 or 3 minutes.
Start to grill skin side down. I used my trusty Big Green Egg which has also been called the Aguacate from time to time. 

Flip the fish one last time so that you can spoon on some more sauce and as soon as the sauce is on, remove the fish to a serving plate. Serve with chopsticks a dish of ponzu.
Just eat it! Don't be afraid to just jump in with your chopsticks and fingers to get all the meat.